Did you know that responsive search ads drive 61% more conversions and achieve a 96% increase in click-through rates compared to traditional ad formats?
Google has completely phased out expanded text ads (ETAs) since June 2022, making responsive search ads the standard for search advertising. These flexible ad formats let you create up to 15 different headlines and 4 descriptions that Google tests automatically to find the best performing combinations. Your ad can appear in an impressive 43,680 possible variations!
Google responsive search ads excel at adapting to new search behaviors. Research shows that 15% of daily searches include new keywords that marketers haven’t seen before. Advertisers who switch from expanded text ads to RSAs with the same assets see an average of 7% more conversions at a similar cost per conversion. RSAs also generate 4 times the impressions of a typical expanded text ad.
You need to become skilled at responsive search ads to stay competitive in today’s PPC world, whether you’re new to digital advertising or want to improve your existing campaigns. This piece will show you expert-tested methods that deliver measurable results for your advertising efforts.
What Are Responsive Search Ads and How Do They Work?
Responsive search ads (RSAs) are the life-blood of PPC campaigns that work. They’ve taken over from traditional ad formats to give us a better way to reach potential customers.
Definition and purpose of RSAs
Responsive search ads let advertisers create multiple headlines and descriptions. Google tests these automatically to find the best-performing combinations. These ads adjust themselves to show messages that match your target audience’s search queries, devices, and browsing habits.
Google’s machine learning system works with up to 15 headlines and 4 descriptions you provide. The system tests different versions against each other. It removes duplicates and rates the remaining ones based on how relevant they are and how well they might perform. Google’s algorithm learns and refines its approach as time goes on, figuring out which text combinations work best for different searches.
RSAs help advertisers reach more people by matching ad content with user intent more accurately. This flexibility lets ads compete in more auctions and match more searches without testing every possible version manually.
How RSAs differ from expanded text ads
RSAs and expanded text ads (ETAs) are quite different in how they’re built and how much control advertisers have. ETAs needed static ads with three 30-character headlines and two 90-character descriptions in a fixed layout. RSAs bring a more automated and flexible approach to the table.
With expanded text ads, you knew exactly how your ad would look to users. You had complete control over the message and appearance, but you needed to create multiple versions yourself for testing.
Here’s how responsive search ads are different:
ETAs: Fixed format with manual combinations and complete preview visibility
RSAs: Dynamic format with automated testing and limited preview capability
RSAs have a unique feature called pinning. You can pin certain headlines or descriptions to specific positions if you need more control. Let’s say you want a particular headline to always show up first – just pin it there and Google will optimize everything else.
Why RSAs matter in modern PPC
The move to responsive search ads shows how search behaviors are changing and Google’s growing focus on machine learning. About 15% of daily searches include terms nobody has searched for before. Static ads don’t deal very well with this challenge.
RSAs give advertisers several big advantages that make them vital for modern PPC strategies:
Broader reach: Multiple headlines and descriptions help your ads compete in more auctions and match more searches.
Improved relevance: Your ads adapt to each user’s context, location, search intent, and device.
Increased efficiency: Google reports that responsive search ads get 5-15% higher CTR than static ads, and businesses see up to 61% more conversions.
Time efficiency: Google’s algorithm finds winning combinations instead of manual testing.
RSAs take up more SERP space than expanded text ads did. They can fill the entire above-the-fold view on mobile devices. This extra visibility makes it even more important to optimize your RSAs.
Google rotates headlines and descriptions automatically to test thousands of versions (over 43,000 possible combinations) and find what works best for specific audiences. So your ads become more personalized, which leads to better engagement and conversion rates.
How to Create Responsive Search Ads in Google Ads
Google Ads makes it easy to create your first responsive search ad. The platform works great for both newcomers and seasoned advertisers. You can build effective RSAs that deliver results through desktop or mobile interfaces.
Step-by-step setup process
The logical setup of responsive search ads starts with your Google Ads account login. Your first task is to find the Ads section through these simple paths:
On desktop: Look for the Campaigns icon on the left sidebar, then choose Ads & extensions > Ads from the menu
On mobile app: Hit More at the bottom, then pick Ads
The blue + button starts your ad creation. Pick Responsive search ad from the dropdown menu to launch the RSA builder interface.
Google will review your ad after you save it. Each ad group lets you add up to three responsive search ads. This gives you room to test different messages while keeping the same targeting settings.
Choosing the right campaign and ad group
The platform asks you to pick your ad’s location in the account structure after you start creating a new responsive search ad. You’ll need to:
Pick your target campaign
Select an ad group within it
Your choice matters because it sets:
The keywords that trigger your ad
Who sees your message
Your ad’s budget and bidding approach
The ad group’s keywords should match your planned content. Your headlines and descriptions need to include the main keywords naturally. This helps improve quality scores and overall results.
Adding headlines, descriptions, and final URL
The ad creation screen appears after you pick your campaign and ad group. Here’s where you’ll add your RSA’s essential parts:
Final URL: Your landing page link should match what you’re advertising. Users expect to find relevant content after clicking.
Display Path: Two path fields make your display URL more informative. Each can have 15 characters. Example: “yourdomain.com/dog-grooming/appointments.”
Headlines: You need 3-15 headlines with 30 characters each. More headlines let Google test different combinations. Write headlines that:
Use keywords naturally
Show distinct benefits
Tell people what to do
Solve customer problems
Descriptions: Add 2-4 descriptions of 90 characters each. These build on your headlines and persuade people to click.
The Ad strength meter shows how well you’ve written your content. Shoot for “Good” or “Excellent” ratings to get better results.
The pin icon lets you lock specific headlines or descriptions in place. Use this feature carefully – too much pinning limits Google’s testing ability and might hurt performance.
Check how your ad looks on different devices using the preview panel on the right. Hit Save when you’re happy with your responsive search ad.
Understanding RSA Components and Character Limits
Understanding responsive search ad parameters is crucial to make them work better. Each element has specific character limits that affect how your ads show up in search results.
Headline and description limits
Google’s responsive search ads let you create multiple text variations that it can mix and match. You can write 3-15 headlines, with each one limited to 30 characters. While you need at least 3 headlines, creating 8-10 gives Google’s system more room to optimize your ads.
Description requirements are different. You need at least 2 descriptions but can have up to 4 total. Each description gets a 90-character limit, which gives you more space to explain your offer or unique selling points.
Your ad will show up to 3 headlines and 2 descriptions in each impression. Smaller screens or crowded search pages might display fewer elements – sometimes leaving out your third headline or second description. Your ad will always show at least 2 headlines and 1 description.
These character limits help create focused messages. They might seem tight at first, but they help you write clear and precise ad copy. Note that Google can create over 43,000 possible combinations from your headlines and descriptions. This makes it vital to craft each element with care.
Display URL and path fields
Responsive search ad display URLs combine your domain with optional path fields to show more about your landing page. These appear in green text under your headlines.
Your domain comes straight from your final URL. You can add two optional path fields after that, each with a 15-character limit. To cite an instance, see how “www.example.com” with paths “mens_shoes” and “outdoor” becomes “www.example.com/mens_shoes/outdoor“.
Path fields don’t need to match your actual URL structure. They help potential customers understand where clicking your ad will take them. This extra context helps boost click-through rates by setting the right expectations.
Path fields are optional, but they are a great way to get extra keywords or explain your offering. Even with just 15 characters each, they can highlight product categories, promotions, or other key details.
How Google assembles ad combinations
Google’s system follows several steps to create the most relevant responsive search ad. It starts by analyzing the search query and keywords. Then it builds various combinations from your headlines and descriptions, focusing on what’s relevant and likely to perform well.
The process includes:
Removing duplicate or redundant combinations
Scoring the remaining options based on relevance
Advancing the best-scoring combinations to the auction
Selecting winners based on quality and relevance
This evaluation happens with almost every search, so your ads keep adapting to match search intent. Google’s algorithms learn which combinations work best for different queries, devices, and contexts over time.
The combinations report shows you which versions Google displays most often. While you can see impressions for different asset combinations, Google suggests not using this to create static ads since RSAs work best when dynamic.
Automated testing is what makes responsive search ads powerful. Instead of creating dozens of ad versions manually, Google tests thousands of combinations to find what works best. This saves advertisers time and improves relevance for different search queries.
Expert-Tested Method #1: Use Diverse and Relevant Headlines
Your responsive search ad’s success depends mainly on your headlines’ quality and variety. Google’s machine learning shows different headline combinations based on search context. Learning to create great headlines is your first chance to optimize performance.
Avoiding repetition
RSAs work best with distinct, non-repetitive headlines. Google asks you to make your headlines and descriptions different from each other to avoid saying the same thing. More variety in headlines lets Google create better combinations that boost your ad’s results.
Check if your headlines read naturally together. You wouldn’t want “24/7 Customer Support” and “Outstanding Customer Service” as separate headlines since they say pretty much the same thing. Google might even reject RSAs that have headlines that are too similar.
Quality beats quantity – you don’t need to hit all 15 headlines. Each headline should tell something new about what you offer. Short, catchy headlines work great when they each make a different point about your product’s value.
Covering different value propositions
The best RSAs show many unique selling points that connect with different parts of your target audience. You can expand your headlines beyond the basics by adding:
Different value propositions that match various customer needs
Current offers or promotions
Real benefits from your product or service
Things that make you stand out from competitors
Many people find it hard to write enough different headlines. You can look at each headline as a chance to show off something new about your business. One headline might talk about price, another about quality, and a third about how easy it is to use.
Your headlines should work well together no matter which ones Google shows. This takes careful planning – headlines need to support each other while being strong enough to stand alone.
Using keyword variations naturally
Keywords still matter a lot for RSA performance. Google suggests putting at least one of your target keywords in your headlines to stay relevant. Try to use your target keywords in about 20-30% of headlines – that’s 2-3 keywords for 10 headlines, or 3-4 for 15 headlines.
The system shows your ad group’s popular keywords while you write to help make relevant headlines. You can also use keyword insertion to boost relevance without manual updates.
Good keyword use does two important things. It tells Google your ad matches specific searches. It also makes your ad more visible and clickable by using terms people actually search for. KFC Malaysia tried this with Google’s Ad strength tool and saw orders jump by 40%.
Keywords matter but stuffing too many wastes your limited characters. Mix keyword headlines with creative messages about benefits, solutions, and calls-to-action.
These headline strategies help create responsive search ads that adapt well to different searches and what users want.
Expert-Tested Method #2: Pin Strategically, Not Excessively
Pinning serves as a powerful tool in your responsive search ads arsenal, but many advertisers don’t quite grasp its true purpose and how it affects their campaigns. At its core, pinning lets you control where specific headlines or descriptions show up in your ad, giving you strategic control while Google handles automation.
When to pin headlines or descriptions
Message control sometimes matters more than testing flexibility, and that’s where pinning makes sense. You might want to think about pinning in these situations:
Legal requirements: You need to show disclaimers or specific regulatory language in every ad impression
Brand consistency: Your brand name must appear in a prominent position
Promotions or offers: Time-sensitive deals need highlighting
Value propositions: High-converting messaging deserves consistent placement
Pinning works best for targeted campaigns where conversion rate matters more than maximum reach. Message consistency often beats broad testing in niche or highly-targeted campaigns. You should avoid pinning for high-volume campaigns that need maximum reach and testing capability.
Headlines or descriptions pinned to Headline position 1, Headline position 2, or Description position 1 will always display. Content pinned to Headline position 3 and Description position 2 might not appear in every ad. Critical information belongs in those guaranteed positions.
How pinning affects ad strength and performance
Control and optimization create natural tension with pinning. Google’s ad strength indicator usually downgrades ads that have pinned elements. You’ll find it very hard to achieve an “Excellent” rating with any pinning.
This happens because pinning cuts down the number of possible headline and description combinations Google can test. A single pinned headline eliminates over 93% of possible ad variations.
Studies suggest ad strength might not relate directly to performance. Research looking at over 93,055 responsive search ads found RSAs with every position pinned showed strong metrics like CTR and conversion rates. RSAs with higher ad strength received more impressions 56.8% of the time, while lower ad strength ads got more impressions 36.6% of the time.
Well-written pinned assets can deliver better performance despite lower ad strength scores. Years of optimized ad copy and proven messages can streamline the learning process by giving Google fewer variables.
Best practices for pinning
These expert-tested practices help maximize pinning benefits while reducing drawbacks:
Pin multiple assets to the same position – Pin 2-3 relevant headlines to position 1 instead of just one. Google can rotate these options while you retain control over that position.
Don’t pin headlines everywhere – This creates a pseudo-expanded text ad and defeats responsive search ads’ purpose. Leave some positions unpinned for testing.
Pin strategically for relevance – Keyword-focused headlines pinned to position 1 can improve ad relevance and lower CPCs even with reduced ad strength.
Shoot for “Good” ad strength – “Good” rather than “Excellent” ad strength becomes your target with pinning, since excellence is hard to achieve.
Compare pinned versus unpinned ads – Run tests between pinned and unpinned versions to see what works best for your audience and campaign goals.
Handle disclaimers right – Required disclaimers should go in Description position 1 to guarantee they show up.
One asset can’t be pinned to multiple positions, and unpinned assets won’t show up in pinned positions. Your pinning strategy needs careful planning before implementation.
Expert-Tested Method #3: Leverage Ad Strength and Asset Labels
Google’s two powerful tools to optimize responsive search ads are often overlooked by advertisers: Ad Strength and asset labels. These features can work together to boost your campaign results significantly.
What ad strength really means
Ad Strength serves as Google’s evaluation metric to assess your responsive search ad content’s relevance, quality, and diversity. The rating scale ranges from “Poor” to “Excellent” and shows how well your ad aligns with best practices. The system calculates this predictive measure before your ads start running.
Many people think Ad Strength affects ad rank or quality score, but that’s not true. The metric still proves valuable as a performance indicator. Advertisers who boost their Ad Strength from “Poor” to “Excellent” typically see 12% more conversions. Each rating increase (like “Poor” to “Average”) leads to roughly 3% more clicks.
How to improve it without sacrificing performance
Your Ad Strength can improve without hurting performance if you:
Add sufficient assets: Pack in various headlines and descriptions up to the allowed limit
Include keywords: Weave target keywords naturally into your assets
Create unique content: Make each headline and description stand out with distinct information
Balance asset types: Use all required asset types with good variety and text diversity
MyFlightSearch, an online travel agency, took this approach. They focused on creating responsive search ads with “Good” and “Excellent” Ad Strength. The result? They saw 14% more conversions and cut booking costs by 15%.
A solid baseline matters, but don’t obsess over Ad Strength. Smart marketers often find success with ads that break conventional rules yet perform brilliantly for their target audience.
Using asset labels for optimization
Asset labels work differently from Ad Strength. These labels give performance-based feedback after your ads run. Google tags individual headlines and descriptions based on actual performance data to show which elements appeal to your audience.
Frederick Vallaeys, a PPC expert, suggests watching these asset labels for about two weeks. After that, you should swap out any underperforming assets. This method gives Google’s system enough time to gather data while keeping your ad content fresh.
The quickest way to use this method is to check your Google Ads dashboard often. Look at the assets section of your RSA and spot the performance labels. Your responsive search ads will keep getting better as you replace underperforming assets based on ground results rather than predictions.
Expert-Tested Method #4: Analyze Combinations and Performance Reports
The true potential of responsive search ads emerges when you analyze their performance and make continuous improvements. Google’s powerful reporting tools show which combinations strike a chord with your audience.
Using the combinations report
The combinations report gives you a great way to learn about all ad combinations created from your responsive search ads and their performance data. You’ll see which headline-description pairings get the most impressions. Here’s how to find this useful report:
Go to your Google Ads account and click the Campaigns icon
Select “Ads” from the dropdown menu
Look for your responsive search ad and click “View assets details”
Click the “Combinations” tab in the top menu
This report shows your most common asset combinations and helps you understand which elements Google’s system prefers. Google advises against using this report to create static versions of your ads because responsive search ads work best when they adapt to up-to-the-minute signals like search queries and user priorities.
Identifying top-performing asset pairs
Your reports should focus on these key metrics to review performance:
Impressions: The frequency of each asset’s appearance (replace assets with zero impressions after several weeks)
Conversions: User actions that count when they interact with your ad and complete valuable tasks
Clicks: The number of users who click your ad with specific assets
CTR: Clicks divided by impressions that shows engagement levels
Keep in mind that asset-level metrics count each instance when the asset appears within an ad. A single ad impression with three different assets registers one impression for each asset. Ratio metrics like CTR should guide you directionally since they don’t show how individual assets perform in isolation.
Making data-driven adjustments
Your performance data helps you refine responsive search ads through strategic changes:
Record all tested headlines and descriptions in a spreadsheet and label them as “Low,” “Good,” or “Best” performers
Remove underperforming copy while testing new variations based on real-life data
Look at performance across the campaign instead of focusing only on individual assets
Check performance every two weeks to gather enough data before making changes
Unpinned variants often produce better results. A case study showed the unpinned version achieved a 38% higher conversion rate, 148% better CTR, and 55% lower cost per click. These results highlight the benefits of letting Google’s machine learning test combinations freely.
Expert-Tested Method #5: Combine RSAs with Smart Bidding and Broad Match
Google’s complete AI ecosystem helps realize the full potential of responsive search ads. Smart marketers know that RSAs, Smart Bidding, and broad match keywords work together to multiply performance results.
How automation improves RSA performance
Google’s AI capabilities and responsive search ads work together to revolutionize campaign effectiveness. RSAs must complement Smart bidding for Google to deliver the best user experience and account performance. Google’s AI examines thousands of data signals during the auction process. These signals include demographics, device type, location, and time-of-day to optimize your bids with up-to-the-minute data analysis.
RSAs give Google’s system the flexibility to create the most relevant ad for each search query. This combination of flexible ad content and intelligent bidding creates what Google calls a “performance multiplier effect” where each component makes the others better.
Smart Bidding best practices
RSAs and Smart Bidding work best together when you have specific performance goals. You should use Smart Bidding strategies like Maximize Conversions with an optional target CPA or Maximize Conversion Value with an optional target ROAS.
Advertisers who changed from target CPA to target ROAS saw 14% more conversion value while maintaining similar return on ad spend. These strategies work best when Google’s AI has enough conversion data to learn from.
Benefits of broad match with RSAs
RSAs and Smart Bidding paired with broad match keywords create a powerful combination that adapts as consumer behavior changes. This trio helps you connect with the right customers using the right message at the right price, whatever search variations they use.
UK company tails.com showed these results by increasing sign-ups in Germany from generic Search campaigns by 182% and clicks by 258%. Broad match reaches beyond exact and phrase match capabilities. Your responsive search ads can appear for more relevant queries.
Conclusion
Responsive search ads have revolutionized the PPC world with their dynamic approach to reaching potential customers. This piece explores five tested methods that will boost your RSA performance by a lot. These strategies work together and create ads that adapt to user search behaviors while delivering great results.
Your responsive search ads’ success depends on how well you implement them. Google needs plenty of high-quality content to test, so create diverse and relevant headlines. Strategic pinning gives you control when needed without losing automation benefits. The ad strength indicators and asset labels guide you to optimize continuously.
Regular performance analysis leads to long-term success. Your combinations report shows which elements appeal most to your audience. This data helps you make smart adjustments that improve results over time.
RSAs work best when they team up with Google’s broader AI ecosystem. RSAs, Smart Bidding, and broad match keywords create a multiplier effect that adapts to changing consumer behaviors and maximizes your ad budget.
Responsive search ads have become the standard for search advertising that works. These optimization techniques give you an edge in grabbing potential customers’ attention. Apply these tested methods today, and you’ll see better click-through rates, higher conversions, and improved campaign performance.
FAQs
Q1. How many responsive search ads should I create per ad group? You can create up to three responsive search ads (RSAs) per ad group. However, for most ad groups, creating one well-optimized RSA with diverse headlines and descriptions is often sufficient to allow Google’s system to effectively test combinations and optimize performance.
Q2. How can I improve the performance of my responsive search ads? To enhance RSA performance, focus on creating diverse and relevant headlines, use pinning strategically, leverage ad strength indicators and asset labels, analyze performance reports regularly, and combine RSAs with smart bidding and broad match keywords for optimal results.
Q3. What is ad strength in responsive search ads and why is it important? Ad strength is Google’s evaluation of your RSA’s relevance, quality, and diversity. While it doesn’t directly impact ad rank or quality score, improving ad strength from “Poor” to “Excellent” can lead to an average of 12% more conversions. It serves as a helpful guide for optimizing your ad content.
Q4. How often should I review and update my responsive search ads? It’s recommended to review your RSA performance regularly, typically every two weeks. This timeframe allows Google’s system to gather sufficient data while ensuring your ad content stays fresh and effective. Replace underperforming assets and test new variations based on the performance data.
Q5. Can I control which headlines or descriptions appear in my responsive search ads? Yes, you can use the pinning feature to control where specific headlines or descriptions appear in your RSAs. However, it’s best to use pinning sparingly, as it limits Google’s ability to test different combinations. Consider pinning only when necessary for legal requirements, brand consistency, or highlighting specific offers.
Ecommerce SEO is the process of optimizing an online store so that product pages, category pages, and supporting content rank higher in search engines and — increasingly — get cited in AI-generated answers. The goal is organic traffic that converts into revenue without per-click advertising costs.
In 2026, that definition has expanded. Product pages now compete across three surfaces simultaneously: the traditional organic search results, Google Shopping and merchant listings, and AI Overviews — the AI-generated answer boxes that now appear on roughly 14% of shopping queries, up from just 2.1% in November 2025. Ranking on one surface while being invisible on the others leaves money on the table.
This guide covers every layer of ecommerce SEO as it works today: keyword research, product and category page optimization, site architecture, technical performance, content strategy, link building, structured data, and the new discipline of Generative Engine Optimization (GEO) that determines whether AI systems recommend your products.
How Ecommerce SEO Differs from Regular SEO
Standard website SEO and ecommerce SEO share the same underlying principles — relevance, authority, technical health, user experience. But online stores face a distinct set of challenges that content-only websites don’t encounter.
Scale. A blog might have 200 pages. An ecommerce store can have 50,000 product URLs, thousands of category and filter combinations, and hundreds of variant pages for size, color, and material. Managing SEO across this volume requires systematic processes, not manual page-by-page optimization.
Duplicate content. Products in multiple categories generate duplicate URLs. Manufacturer descriptions shared across retailers create cross-site duplication. Size and color variants often produce near-identical pages. Left unmanaged, these issues dilute crawl budget and confuse search engines about which page to rank.
Thin content. Many product pages have little more than a title, a price, and a manufacturer spec sheet. Search engines struggle to differentiate these pages from thousands of similar ones across the web.
Faceted navigation. Filter menus on category pages — size, color, price range, brand — can generate millions of indexable URL combinations from a few thousand actual products. Google’s Gary Illyes has attributed 50% of reported crawling issues to faceted navigation, with sorting parameters accounting for another 25%.
Transactional intent. Ecommerce keywords often carry strong purchase intent, which means the competition for top positions is fierce and the commercial value of ranking is high.
Understanding these differences shapes every decision you make in ecommerce SEO — from how you structure your site to how you write product descriptions to how you manage your crawl budget.
Keyword Research for Ecommerce
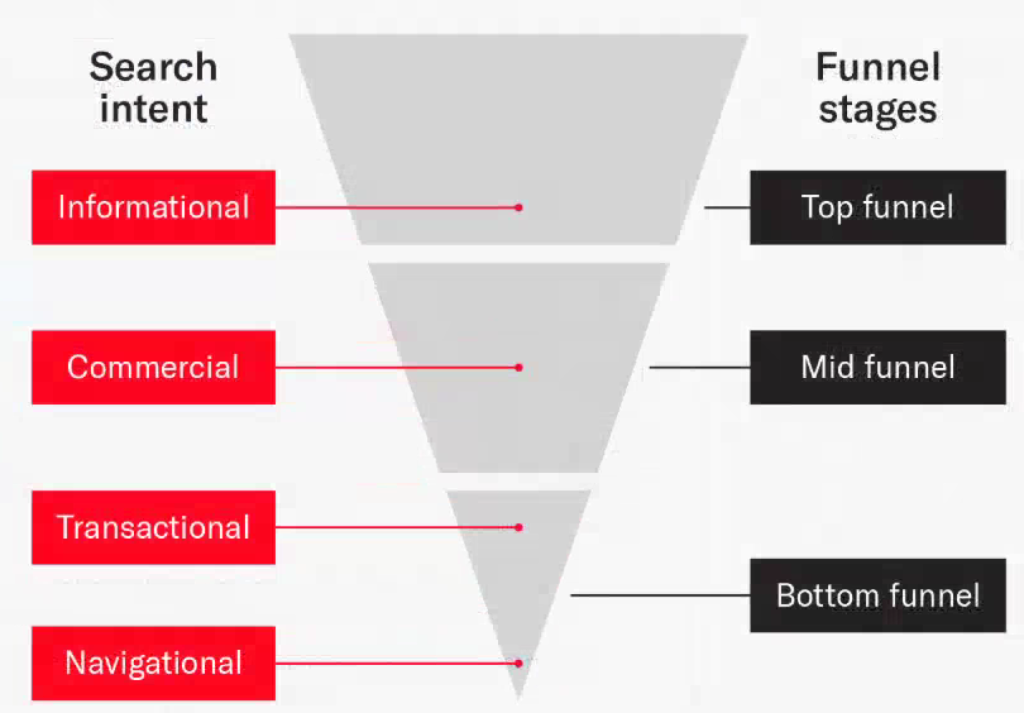
Keyword research for an online store isn’t just about finding high-volume terms. It’s about mapping search intent to the right page type — product pages for transactional queries, category pages for commercial comparison queries, and blog content for informational queries.
Search Intent Categories
Transactional intent — the searcher is ready to buy. Queries like “buy wireless noise-cancelling headphones” or “order organic matcha powder online” signal immediate purchase intent. These should map to product pages with clear pricing and add-to-cart functionality.
Commercial investigation — the searcher is comparing options before buying. Queries like “best running shoes for flat feet” or “top-rated espresso machines under $500” signal research mode. These should map to category pages, comparison guides, or curated collection pages.
Informational intent — the searcher wants to learn something related to your products. Queries like “how to choose a camping tent size” or “difference between French press and pour-over coffee” signal early-stage interest. These should map to blog posts and buying guides that link to relevant product pages.
Navigational intent — the searcher is looking for a specific brand or website. Queries like “Patagonia rain jacket” or “IKEA standing desk” should map to your brand or product pages if you carry those products.
Long-Tail Keywords for Ecommerce
Specific, multi-word queries make up approximately 70% of all search traffic. For ecommerce, long-tail keywords are particularly valuable because they signal clearer purchase intent and face less competition.
“Running shoes” is a broad, highly competitive keyword. “Women’s waterproof trail running shoes wide width” is a long-tail query with far less competition and a much higher conversion likelihood — the searcher knows exactly what they want.
Tools for finding ecommerce keywords include Google Keyword Planner (free, shows volume and competition), Google’s autocomplete and “People Also Ask” suggestions (free, reflects real search behavior), Ahrefs (paid, provides difficulty scores and traffic estimates), and Semrush (paid, includes intent classification for each keyword). When evaluating keywords, focus on three metrics: search volume (demand), keyword difficulty (competition), and commercial value (indicated by CPC data).
Product Page Optimization
Product pages are where organic traffic converts into revenue. Every element — from the title tag to the image alt text to the structured data — contributes to both ranking and conversion.
Title Tags and Meta Descriptions
The title tag is the single most influential on-page SEO element for product pages. Structure it as: Primary Keyword + Product Name + Key Attribute + Brand. Keep it under 60 characters (roughly 575 pixels) to avoid truncation in search results.
Meta descriptions don’t directly affect rankings, but they determine click-through rate from search results. Write them between 70-155 characters, include a call to action (“Shop now,” “Free shipping”), and mention the most compelling product benefit or offer.
For stores with thousands of products, build templates that auto-generate titles and descriptions from product data fields. For example: “[Product Name] – [Key Feature] | [Brand] | [Store Name]” for titles and “Shop [Product Name] at [Store Name]. [Key Benefit]. [Price] — free shipping on orders over [threshold].” for descriptions. Keep the option to manually override templates for high-priority pages.
Unique Product Descriptions
Copying manufacturer descriptions that appear on dozens of other retailer sites is one of the most common ecommerce SEO mistakes. Search engines can’t differentiate your page from competitors using identical text.
Write unique descriptions that focus on how features benefit the customer rather than just listing specs. A mattress company doesn’t just sell “high-density memory foam” — they sell better sleep for people with back pain. Connect product attributes to customer outcomes.
Include relevant long-tail keywords naturally. Use formatting (subheadings, short paragraphs, bullet points for specs) to make descriptions scannable. Aim for at least 150-300 words of unique content per product page. Higher-value products warrant longer, more detailed descriptions.
Product Images and Alt Text
High-quality product images directly affect conversion rates — 85% of shoppers say product imagery influences their brand selection. The average buyer wants to see multiple images from different angles, not a single photo.
For SEO, every image needs three things: a descriptive filename (red-leather-crossbody-bag.jpg, not IMG_4382.jpg), accurate alt text that describes what the image shows (used by screen readers and search engines), and compressed file size (use WebP or AVIF formats, keep hero images under 200KB) for page speed.
Alt text should describe the image honestly and naturally — “Women’s red leather crossbody bag with gold hardware, front view” is useful. “Best cheap leather bags women buy discount red leather bag” is keyword stuffing and may trigger spam filters.
Customer Reviews on Product Pages
Over 90% of consumers read reviews before purchasing. Reviews help SEO in multiple ways: they add fresh, unique content to pages that would otherwise remain static; they naturally include long-tail keywords in authentic language; they generate social proof that improves conversion rates; and when marked up with AggregateRating schema, they produce star ratings in search results that boost click-through rates.
Ask customers specific questions about their experience rather than requesting generic feedback. Questions like “How does this fit compared to your usual size?” or “What do you primarily use this product for?” generate more detailed, keyword-rich responses.
Category Page Optimization
Category pages are often the highest-value pages for ecommerce SEO because they target broader commercial keywords with higher search volume than individual product pages. A well-optimized “Women’s Running Shoes” category page can rank for dozens of related queries.
Add unique introductory text (150-300 words) above or below the product grid that explains what the category includes, who it’s for, and what differentiates your selection. This gives search engines content to index beyond just product titles and prices.
Use descriptive H1 tags that include the primary keyword. Structure subcategory links logically. Include filter options that help users narrow their selection — but manage the faceted navigation carefully (covered in the technical section below).
Internal linking from category pages to key products, and from blog content back to category pages, builds topical authority and helps distribute link equity to the pages most likely to generate revenue.
Site Architecture and Navigation
How your pages are organized and connected determines both how easily customers find products and how efficiently search engines crawl and index your store.
Flat, Scalable Hierarchy
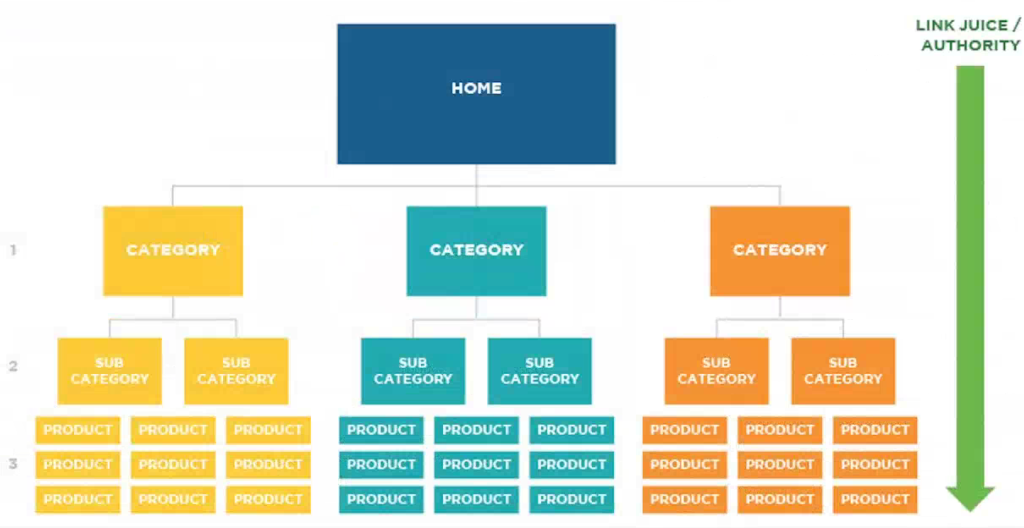
The ideal ecommerce site structure has three levels: Homepage → Categories → Products. Subcategories add a fourth level when needed (Homepage → Categories → Subcategories → Products). Every product page should be reachable within three clicks from the homepage.
This flat structure distributes link equity broadly, makes crawling efficient, and gives users a clear mental model of your store’s organization. Avoid deep hierarchies where products are buried five or six clicks from the homepage — these pages receive less internal link authority and are crawled less frequently.
Breadcrumb Navigation
Breadcrumbs show users their location within your site hierarchy (Home > Women’s Clothing > Dresses > Maxi Dresses). They serve three purposes: users can navigate back to higher-level pages without the browser back button, search engines understand your content hierarchy, and BreadcrumbList schema markup can display your breadcrumb path directly in search results.
Place breadcrumbs at the top of each page, above the main content. Use BreadcrumbList structured data to help Google display them in search results.
URL Structure
URLs should reflect your site hierarchy: example.com/women/running-shoes/nike-pegasus-41. Keep URLs readable, lowercase, hyphenated, and free of unnecessary parameters. Avoid URLs like example.com/product?id=48291&cat=shoes&color=black — these are hard for users to understand and offer no keyword signals.
Technical SEO for Ecommerce
Technical SEO determines whether search engines can access, understand, and index your content. For ecommerce sites with large catalogs, technical issues can silently prevent thousands of pages from appearing in search results.
Managing Faceted Navigation
Faceted navigation is the single biggest technical SEO challenge for ecommerce sites. Size, color, brand, price range, and material filters can multiply a few hundred category pages into millions of indexable URL combinations. Log file analysis consistently shows that 40-60% of Googlebot’s crawl budget on unmanaged ecommerce sites goes to these filter URLs.
Every filter combination falls into one of four categories:
Indexable — filter combinations that match queries with real search volume. “Men’s black running shoes” might have thousands of monthly searches. Create a clean, indexable URL with a unique H1, unique introductory text, and a self-referencing canonical tag. Zalando does this effectively, treating high-demand faceted pages as standalone collection pages.
Canonicalized — filter combinations without meaningful search volume but not harmful. Canonicalize these back to the parent category page so search engines understand the relationship without wasting crawl resources.
Blocked — filter combinations that should never be crawled. Price sorting, rating sorting, and pagination parameters typically fall here. Block them in robots.txt rather than using noindex — noindex still consumes crawl resources because Googlebot must visit the page to find the noindex directive.
AJAX-only — filter results that load dynamically without changing the URL. The most crawl-efficient approach for filters with no SEO value, since no new URL is created for Googlebot to discover.
The decision for each filter combination should be based on search volume data. If “red leather boots size 8” has meaningful search demand, make it indexable. If “boots sorted by price low to high” has none, block it.
Core Web Vitals in 2026
Page speed and interactivity directly affect both rankings and conversion rates. Sites loading in 1 second see conversion rates 2.5 times higher than those taking 5 seconds.
The three Core Web Vitals metrics for 2026:
Largest Contentful Paint (LCP) — measures loading performance. Target: under 2.5 seconds. For product pages, the LCP element is typically the hero product image. Serve it in WebP or AVIF format, use srcset for responsive sizing, and keep file size under 200KB.
Interaction to Next Paint (INP) — replaced First Input Delay (FID) as a Core Web Vital. Measures how quickly the page responds to user interactions. Target: under 200 milliseconds. For ecommerce, the critical interactions are “Add to Cart” buttons, image carousels, and filter menus. Third-party scripts (live chat, analytics, review widgets) are the most common INP killers — defer or lazy-load anything that isn’t critical for initial page interaction.
Cumulative Layout Shift (CLS) — measures visual stability. Target: under 0.1. Product images loading late and pushing content down the page is the most common CLS issue on ecommerce sites. Set explicit width and height attributes on all images to reserve space before they load.
Duplicate Content Management
Use canonical tags to tell search engines which version of a page is the primary one. Common scenarios requiring canonicalization: products accessible through multiple category URLs, HTTP vs. HTTPS versions, www vs. non-www versions, and URL parameters from tracking or sorting.
Set shopping cart pages, internal search results, and wishlist pages to noindex,follow — they have no SEO value but their outbound links still help search engines discover product pages.
XML Sitemaps
Submit XML sitemaps to Google Search Console that list all indexable product, category, and content pages with their canonical URLs and last-modified dates. Segment large sitemaps by content type (products.xml, categories.xml, blog.xml) for easier monitoring in Search Console. Sitemaps are limited to 50,000 URLs or 50MB — use a sitemap index file for larger stores.
IndexNow for Inventory Changes
The IndexNow protocol lets you push URL updates directly to search engines (Bing, Yandex, and data streams feeding ChatGPT) instead of waiting for crawlers to discover changes. For ecommerce sites with frequently changing prices, stock levels, and new products, IndexNow reduces the delay between updating your site and search engines reflecting those changes. Google doesn’t support IndexNow directly but has its own Indexing API for eligible content types.
Content Strategy: Building Topical Authority
Product and category pages target transactional and commercial keywords. But to build the topical authority that lifts your entire site’s rankings, you need informational content that answers the questions shoppers ask before, during, and after purchasing.
The Pillar-Cluster Model for Ecommerce
Organize your content around topic clusters. A pillar page covers a broad topic comprehensively (e.g., “The Complete Guide to Home Espresso”). Cluster articles cover specific subtopics in depth (e.g., “Burr Grinder vs. Blade Grinder,” “How to Dial In Espresso Shot Timing,” “Best Espresso Beans for Milk Drinks”). The pillar links to every cluster article; each cluster article links back to the pillar and to relevant product/category pages.
This interconnected structure builds topical authority — search engines recognize your site as a deep resource on the subject, which benefits the ranking of every page in the cluster, including your commercial pages.
Content Formats That Work for Ecommerce
Buying guides — help shoppers understand what to look for when choosing a product. “How to Choose a Camping Tent: Size, Seasonality, and Weight Explained” targets informational keywords while linking to your tent category page.
Comparison content — addresses commercial investigation queries directly. “French Press vs. Pour Over vs. AeroPress: Which Brewing Method Is Right for You?” positions your store as a knowledgeable authority and links to products in each category.
How-to content — shows product usage and builds trust. “How to Season a Cast Iron Skillet” serves a real user need and links to your cast iron cookware collection.
Trend and seasonal content — captures time-sensitive search demand. “2026 Summer Fashion Trends” or “Best Holiday Gift Ideas for Home Cooks” target high-volume seasonal queries.
Companies with active blogs see 55% more web traffic and 434% more indexed pages. The key is that every piece of content serves a strategic purpose — targeting a specific keyword cluster and linking to specific commercial pages — rather than being published randomly.
User-Generated Content
Customer reviews, Q&A sections, and customer photos add authentic content that search engines value. UGC naturally includes long-tail keywords in real language, generates fresh content on pages that would otherwise remain static, and strengthens E-E-A-T signals (the “Experience” component in particular).
Implement Q&A functionality on product pages where customers can ask questions and receive answers from your team or other customers. This content often matches “People Also Ask” queries in Google and can be marked up with FAQ schema.
E-E-A-T for Ecommerce
Google’s E-E-A-T framework — Experience, Expertise, Authoritativeness, Trustworthiness — determines how credible your site appears to both Google’s quality raters and its ranking algorithms. For ecommerce sites, each component has specific implications.
Experience — Google wants to see evidence that the people behind your content have firsthand experience with the products. Original product photography (not manufacturer stock images), staff-written product reviews, video demonstrations, and “tested by our team” badges all demonstrate real experience. This is the component that separates your product page from a thousand competitors using the same manufacturer description.
Expertise — demonstrate deep knowledge in your product category. Detailed buying guides, technical comparison content, and expert-authored articles build expertise signals. If your store sells hiking gear, content written by experienced hikers carries more weight than generic AI-generated copy.
Authoritativeness — earned through backlinks from relevant industry sites, mentions in media, and consistent brand presence. Category leadership content (original research, trend reports, industry data) builds authority more effectively than thin product descriptions.
Trustworthiness — clear return policies, visible contact information, secure checkout (HTTPS), transparent pricing, and genuine customer reviews all build trust signals. Google’s quality raters specifically evaluate whether a site provides adequate information for financial transactions.
Structured Data and Schema Markup
Schema markup helps search engines understand your content at a granular level and enables rich results — enhanced search listings with star ratings, prices, availability badges, and images that significantly increase click-through rates.
Essential Ecommerce Schema Types
Product schema — the foundation. Include name, description, image, brand, SKU/MPN/GTIN, price, currency, availability, and condition. This data powers Google’s product rich results.
Offer schema — embedded within Product schema. Specifies price, currency, availability, seller, and delivery information. Price and availability must match your landing page exactly — mismatches can trigger disapprovals.
AggregateRating schema — displays star ratings in search results. Include ratingValue, reviewCount, and bestRating. Listings with star ratings consistently see higher click-through rates than those without.
BreadcrumbList schema — displays your site hierarchy in search results. Helps users understand page context before clicking.
FAQ schema — marks up question-and-answer content. While Google now limits FAQ rich results mostly to health and government sites, FAQ schema still helps AI systems extract and cite your content in AI Overviews.
Connected Schema Networks
Individual schema types work better when connected. A Product page should reference its Brand (Organization schema), its BreadcrumbList position, its AggregateRating, and its Offers. This interconnected schema network helps search engines build entity relationships — understanding not just that you sell a product, but what brand it belongs to, how customers rate it, and how it fits within your site’s hierarchy.
Use JSON-LD format (Google’s recommended implementation) rather than Microdata or RDFa. Validate all markup using Google’s Rich Results Test before deploying, and monitor structured data errors in Google Search Console.
Google Merchant Center and Free Product Listings
Beyond standard organic search results, Google offers free product listings through Google Merchant Center. These listings appear in the Shopping tab, Google Search, Google Images, and Google Maps — providing additional organic visibility for your products at no cost.
To participate, upload your product feed to Google Merchant Center with accurate titles, descriptions, images, prices, and availability. The same feed optimization that helps your Shopping ads (clear titles structured as Brand + Product + Key Attributes, high-quality images, accurate pricing) also improves your free listing visibility.
Free listings don’t replace paid Shopping ads, but they provide an additional organic traffic channel that many ecommerce stores underutilize. Monitor performance in the “Performance” tab of Google Merchant Center.
Generative Engine Optimization (GEO) for Ecommerce
GEO is the practice of optimizing your content and brand signals so that AI systems — Google AI Overviews, ChatGPT, Perplexity, Claude — cite, recommend, or summarize your products in their generated responses.
This matters because search behavior is shifting. Around one in five Americans now use AI platforms to search for products. Users ask conversational questions like “What are the best waterproof hiking boots under $200 with good ankle support?” and expect AI-generated recommendations — often without clicking through to any website.
How GEO Differs from Traditional SEO
Traditional SEO earns you a ranking in the list of search results. GEO earns you a mention or citation inside an AI-generated answer. Research from Ahrefs and BrightEdge found that only 17-38% of AI Overview citations come from pages in Google’s top 10 organic results. A page ranking first organically may not appear in the AI Overview displayed above it.
This means GEO requires its own optimization approach on top of traditional SEO fundamentals.
How to Optimize for AI Citation
Structure content for extraction. AI models prefer data formatted in digestible chunks — product specification tables, comparison charts, clear FAQ answers, and concise “product definition boxes” that state what the product is, who it’s for, and what makes it different. Avoid burying key product information in large blocks of unformatted text.
Build entity clarity. AI systems think in entities, not pages. Make sure your brand, products, and categories have consistent names, descriptions, and attributes across your website, Google Merchant Center feed, social profiles, and third-party mentions. Schema markup reinforces entity relationships.
Earn third-party citations. AI models weight mentions from multiple independent sources. Being mentioned in product roundups, industry publications, Reddit discussions, and expert reviews increases the likelihood that AI systems will cite your brand. This overlaps significantly with traditional link building and digital PR.
Create comparison and “best of” content. AI engines frequently draw from content that directly compares products or curates recommendations. Publishing authoritative comparison guides on your own site increases your chance of being the cited source.
Keep product data accurate and real-time. AI Overviews increasingly check price and availability data before recommending products. Ensure your Google Merchant Center feed is updated in near-real-time. As agentic commerce evolves, AI systems will evaluate operational data (stock levels, shipping times, return policies) before making recommendations.
Link Building for Ecommerce
Backlinks from relevant, authoritative websites signal to search engines that your store is a credible source. For ecommerce sites, the most effective link building strategies combine content-driven approaches with product-specific outreach.
Product roundups and gift guides — identify blogs and publications that publish “best of” lists and gift guides in your product categories. Reach out to be included. Some sites require free product samples; others simply need to know you exist. These links are highly relevant because they appear in content that matches commercial search intent.
Guest content on industry publications — contribute genuinely useful articles to publications your target audience reads. The goal isn’t to drop a link — it’s to establish your brand’s expertise while earning a contextual backlink to a supporting resource on your site.
Digital PR and original data — create original research, surveys, or data analyses related to your industry. “We analyzed 10,000 customer orders to find the most popular home office setup” is the kind of content journalists link to because it provides a unique data point they can’t get elsewhere.
Broken link building — find industry resource pages with broken links to products or stores that no longer exist. Offer your relevant page as a replacement. This works particularly well for product categories with high turnover.
Avoid buying links, participating in link exchanges, or using link farms. Google’s algorithms penalize manipulative linking practices, and the short-term ranking benefit isn’t worth the risk of a manual action.
Frequently Asked Questions
How long does ecommerce SEO take to show results?
Most ecommerce sites begin seeing meaningful organic traffic improvements within 3-6 months of implementing a comprehensive SEO strategy. Technical fixes (crawl issues, canonical tags, page speed) often produce the fastest gains. Content and link building compound over 6-12 months. The timeline depends on your site’s current state, competition level, and the resources you invest. SEO is a compounding investment — early results tend to accelerate as domain authority builds.
Do I need a blog for my ecommerce site?
A blog isn’t strictly required, but informational content significantly expands the range of keywords your site can rank for. Product and category pages target transactional and commercial queries. Blog content targets informational queries from people earlier in the buying process — the ones researching before they purchase. Companies with active blogs generate 55% more web traffic. The key is that every blog post should link to relevant product or category pages, creating a path from information to transaction.
How do I handle out-of-stock products from an SEO perspective?
If the product will return to stock, keep the page live with a “notify me when available” option. Don’t delete the URL — it may have backlinks and ranking history you’ll lose permanently. If the product is permanently discontinued, 301 redirect the URL to the most relevant alternative product or category page. Never let discontinued product URLs return 404 errors at scale — this wastes crawl budget and creates dead ends for users arriving from search or backlinks.
Should I use noindex on filtered category pages?
For most filter combinations (price sorting, rating sorting, availability filtering), blocking in robots.txt is more crawl-efficient than noindex. Noindex requires Googlebot to visit the page to discover the directive, which still consumes crawl budget. However, for filter combinations that match queries with real search volume — like “men’s black running shoes” — create indexable pages with unique content and self-referencing canonicals. The decision should be data-driven, based on actual search volume for each filter combination.
How important is mobile optimization for ecommerce SEO?
Critical. Google uses mobile-first indexing, meaning it evaluates the mobile version of your site for ranking purposes. Smartphones drive nearly 80% of retail website visits. Your mobile site needs fast load times (LCP under 2.5 seconds), responsive design that adapts to screen sizes, tap targets large enough for finger navigation, readable text without zooming, and smooth interactivity (INP under 200 milliseconds). A site that works well on desktop but poorly on mobile will underperform in search rankings.
What is the difference between SEO and GEO for ecommerce?
SEO optimizes your pages to rank in traditional search results — the list of blue links. GEO (Generative Engine Optimization) optimizes your content and brand presence to be cited in AI-generated answers — Google AI Overviews, ChatGPT responses, Perplexity recommendations. In 2026, ecommerce sites need both. SEO drives the organic rankings that have been the backbone of ecommerce traffic for two decades. GEO ensures your products are recommended when shoppers use AI tools to research purchases — a behavior that roughly 20% of American shoppers now engage in.
In May 2024, an automated bot called yoshi-code-bot pushed 2,596 modules of internal Google documentation to a public GitHub repository. The files described 14,014 attributes from Google’s Content Warehouse API — a detailed catalog of the signals, metrics, and systems Google uses to evaluate and rank web pages. The documents were never meant to be public. They stayed exposed for approximately six weeks before being removed.
SparkToro co-founder Rand Fishkin and iPullRank CEO Mike King were the first to publish detailed analyses after receiving the documents from Erfan Azimi, who later identified himself as the source. Google initially refused to comment. When press coverage became unavoidable, spokesperson Davis Thompson confirmed the documents were authentic but cautioned against “making inaccurate assumptions about Search based on out-of-context, outdated, or incomplete information.”
That caveat is worth taking seriously. The documents don’t reveal the weights Google assigns to each signal, don’t tell us which signals are actively used versus deprecated, and don’t explain how these signals interact within the ranking algorithm. What they do reveal is the full scope of data Google collects and considers — and in several cases, this scope directly contradicts years of public statements by Google engineers and spokespeople.
This article covers every major finding from the leak, explains what each one means for SEO practitioners, and identifies the specific contradictions between Google’s public position and its internal systems.
How the Leak Happened
The documents originated from Google’s internal code base and were exposed when developers included Content Warehouse API documentation in a code review that got pushed to a public GitHub repository. The timeline: the files appeared on GitHub around March 13, 2024, remained publicly accessible until approximately May 7, 2024, and were analyzed and published by Fishkin on May 27, 2024.
The documents cover API specifications — they describe the data structures, modules, and attributes that Google’s systems use to process and rank content. They don’t contain the actual ranking algorithm (the formulas, weights, and decision trees), but they catalog what inputs the algorithm consumes. Think of it as seeing every ingredient in a kitchen without knowing the exact recipe.
Google’s response was carefully worded. They acknowledged the documents were genuine but emphasized they might be “outdated” or “incomplete.” When pressed on specific contradictions with past public statements, Google said they don’t confirm or deny “sensitive” information about Search to prevent manipulation by bad actors.
Separately, the U.S. Department of Justice’s antitrust trial against Google in 2023-2024 independently confirmed several findings from the leak — particularly NavBoost and the use of click data in rankings — through testimony from Google’s own VP of Search, Pandu Nayak. This cross-verification through a legal proceeding under oath significantly strengthens the credibility of the leaked documents.
SiteAuthority: The Metric Google Said Didn’t Exist
For years, Google representatives publicly denied that Google calculates or uses any kind of domain-level authority metric. John Mueller, Gary Illyes, and other Googlers repeatedly stated that Google evaluates pages individually rather than assigning site-wide authority scores.
The leaked documents tell a different story. Within the CompressedQualitySignals module, there’s an integer field called siteAuthority. It functions as a persistent, composite score calculated at the site or sub-domain level. According to Mike King’s analysis, this metric serves as a foundational input for preliminary ranking in Google’s Mustang system.
This doesn’t necessarily mean Google’s siteAuthority works identically to the “Domain Authority” metrics calculated by third-party tools like Moz or Ahrefs. The calculation methodology is unknown. But its existence is unambiguous — Google does maintain and use a site-level authority signal in its ranking systems, despite publicly denying it.
What contributes to siteAuthority isn’t fully documented, but the surrounding attributes suggest it incorporates anchor signals, on-site prominence, content quality signals, link diversity, and Chrome user behavior data.
What this means for SEO
Building site-level authority matters — not just page-level optimization. This validates the long-held SEO practitioner view that a domain’s overall strength affects individual page rankings. Strategies that improve the entire site (consistent content quality, strong internal linking, accumulating authoritative backlinks) contribute to a rising siteAuthority score that benefits every page on the domain.
NavBoost: Click Data as a Core Ranking Signal
NavBoost is mentioned 84 times in the leaked documents. It’s a system that tracks user engagement with search results and uses that data to adjust rankings. The DOJ antitrust trial independently confirmed its existence and importance — Pandu Nayak testified that NavBoost is “one of the most important” ranking signals Google uses.
This directly contradicts years of public statements. Gary Illyes, Google’s search relations lead, dismissed the possibility of using clicks for rankings in multiple public appearances. Matt Cutts, Google’s former head of web spam, said the same. The leaked documents leave no ambiguity.
NavBoost tracks several specific click metrics:
goodClicks — clicks that result in a satisfied user (long dwell time, no return to search results).
badClicks — clicks where the user quickly returns to search results, indicating dissatisfaction (“pogo-sticking”).
lastLongestClicks — the final result a user clicked on and viewed for the longest duration in a search session. This is a particularly strong satisfaction signal — it suggests the user found what they were looking for and stopped searching.
unsquashedClicks — clicks deemed genuine and valuable (as opposed to bot traffic or manipulated clicks).
NavBoost operates on a rolling 13-month window of aggregated click data. It’s also region-specific — click patterns from users in one geographic region may influence rankings differently than patterns from another region.
The leaked documents also reference a “trendSpam” demotion for CTR manipulation, indicating Google has detection systems for artificial click inflation. Attempts to manipulate click signals may produce temporary ranking improvements, but the documents suggest these gains are ephemeral — rankings tend to revert once artificial clicks stop, and persistent manipulation risks demotion.
What this means for SEO
User satisfaction is a direct ranking input. Pages that consistently satisfy searchers (long engagement, no pogo-sticking) accumulate positive NavBoost signals over time. This makes genuine user experience optimization — page speed, content quality, answering the query thoroughly — a ranking strategy, not just a nice-to-have. It also means that a page ranking well today but failing to satisfy users will gradually lose its position as negative click data accumulates.
The Sandbox Is Real: hostAge and New Site Treatment
Google employees have denied the existence of a “sandbox” — a mechanism that restricts new websites from ranking well for an initial period — since the mid-2000s when SEOs first coined the term. Mueller’s response when asked about it was characteristically dismissive.
The leaked documents contain an attribute called hostAge within the PerDocData module. The accompanying notes state it’s used to identify and handle “fresh spam during serving time.” This confirms that Google does apply different evaluation criteria to new websites based on domain age.
The exact mechanics aren’t fully described. The documents don’t specify how long the sandbox period lasts or what criteria allow a site to emerge from it. But the existence of the attribute is unambiguous — new sites are subject to different signal processing than established sites.
What this means for SEO
New websites should expect a period of reduced visibility regardless of content quality or optimization. Launch strategies need to account for this delay. Building initial authority through brand mentions, social presence, and links from established sites during the sandbox period can help accelerate the transition. The 2024 antitrust trial documents suggest that link profile age and establishment history are factors in how quickly a site exits sandbox treatment.
Chrome Data: Google Tracks More Than It Admitted
Matt Cutts stated publicly that Google does not use Chrome data for rankings. John Mueller reaffirmed this claim. The leaked documents show the opposite.
Multiple modules reference Chrome-sourced data. A field called chromeInTotal captures site-level views from Chrome browsers. Additional attributes track Chrome user behavior including time on page, bounce rate, scroll depth, pages per session, and interaction events.
These signals feed into site-quality assessment at the aggregate level — not just individual page rankings. Chrome data appears to be used as a validation layer, confirming (or contradicting) the quality signals derived from crawled content and link analysis.
The scale of Chrome’s market share makes this significant. Chrome holds approximately 65% of global browser market share. Google has access to behavioral data from a massive sample of web users — data that no other search engine or third-party tool can replicate.
What this means for SEO
If Chrome users consistently bounce from your site within seconds, that behavioral signal feeds into Google’s quality assessment of your domain. This reinforces the importance of genuine user experience — not just technical SEO metrics, but actual on-site engagement. Sites where users stay, scroll, interact, and return build positive Chrome-sourced signals over time.
Content Freshness: Three Dates, One Assessment
The leak reveals that Google doesn’t rely on a single timestamp to assess content freshness. Three distinct date signals are tracked:
bylineDate — the date explicitly stated in the article’s byline or publication date field. This is what most content management systems output as the “published” or “updated” date.
syntacticDate — a date extracted from the URL structure or document title. If your URL contains “/2024/06/” or your title includes “2026 Guide,” Google captures that.
semanticDate — an estimated date derived from the content itself, its anchor context, and related documents. Google’s systems can infer when content was actually written based on the topics it discusses, the sources it references, and the temporal context of surrounding content.
This three-date system explains why simply changing a publication date without updating the actual content doesn’t fool Google. The semanticDate may still indicate the content is old if its references, data points, and examples haven’t been updated.
Content freshness feeds into the Query Deserves Freshness (QDF) algorithm, which boosts recent content for queries where timeliness matters — breaking news, recurring events, trending topics, and subjects that change rapidly. Not all queries trigger QDF. A search for “how photosynthesis works” doesn’t need fresh content. A search for “best smartphones 2026” does.
What this means for SEO
Update content when it genuinely becomes outdated — new data available, recommendations changed, industry shifted. Don’t just change the byline date and republish. Google’s semantic date analysis can identify cosmetic updates versus substantive refreshes. When you do update, make sure the changes are meaningful enough to shift the content’s semantic dating signals.
TitleMatchScore and OriginalContentScore
Two additional scoring signals deserve attention.
TitleMatchScore measures how well a page’s title tag matches a user’s search query. The documents describe this as “a signal that tells how well titles are matching user queries.” Importantly, the documentation suggests Google processes the full text of title tags regardless of display truncation — even if Google shortens your title in search results, the algorithm reads the entire thing.
OriginalContentScore evaluates content originality, with particular application to shorter content. The scoring range is 0-512 for short content. This contradicts the common assumption that short content automatically equals “thin” content in Google’s eyes. A 300-word article that provides genuinely original analysis may score higher than a 3,000-word article that rehashes widely available information.
A related attribute, contentEffort, appears to use large language models to estimate the effort required to create an article. This could help Google differentiate between content that required significant human expertise and content that was quickly assembled by scraping, translating, or algorithmically remixing existing material.
What this means for SEO
Title tags still matter — a lot. Write titles that accurately reflect the page’s content and match the queries you’re targeting. Don’t write clickbait titles that misrepresent the page. For content length, quality and originality matter more than word count. A concise, original piece can outperform a lengthy derivative one.
Topical Authority: SiteFocusScore, SiteRadius, and Embeddings
The leaked documents confirm Google uses vector embedding technology — specifically site2Vec — to create mathematical representations of websites and individual pages. These embeddings capture semantic meaning by converting content into multidimensional numerical coordinates.
Two metrics stand out:
SiteFocusScore measures how concentrated a website’s content is around specific topics. Higher focus scores reward sites with clear thematic identity. A site that publishes exclusively about commercial espresso machines builds a stronger topical signal than a site that covers espresso machines, cryptocurrency, and pet care.
SiteRadius measures how far individual page embeddings drift from the overall site embedding. Pages that stray too far from your site’s topical center may receive weaker ranking support. Google creates a topical identity for your website and assesses each new page against that identity.
Together, these signals explain why niche sites often outrank larger generalist sites for specific queries. A site with a tight SiteFocusScore and small SiteRadius in a particular topic area sends a stronger topical authority signal than a broad site that touches the topic occasionally.
The documents also suggest Google recognizes “topical borders” and evaluates whether content creates legitimate bridges between related subjects. A coffee equipment site expanding into coffee bean sourcing makes topical sense. The same site suddenly publishing content about home insurance does not.
What this means for SEO
Build topical depth before topical breadth. Establish authority in your core subject area with comprehensive, interconnected content before expanding into adjacent topics. When you do expand, create logical bridges — content that connects your core expertise to the new subject through a clear thematic relationship. Random topic expansion dilutes your SiteFocusScore.
Author and Entity Recognition
The documents confirm Google stores author information associated with content and can identify whether an entity is the author of a document. This is the clearest structural evidence for E-E-A-T’s “Experience” and “Expertise” components in the ranking system.
Google’s entity recognition goes beyond just reading bylines. The system can identify entities on a webpage and sort, rank, and filter them. For author entities specifically, Google appears to build profiles that accumulate signals across multiple pieces of content and multiple websites.
What this means for SEO
Author identity matters for ranking. Ensure your content has clear, consistent author attribution. Build author entities through profiles on authoritative platforms (LinkedIn, industry publications, speaking engagements), consistent use of author schema markup, and a body of published work that demonstrates genuine expertise in your subject area.
The smallPersonalSite Attribute
One of the more intriguing discoveries is an attribute called smallPersonalSite. The leaked documents don’t explain how it’s used. Mike King noted that Google could assign a ranking adjustment (“twiddler”) to this attribute that could either promote or demote small personal sites.
Given that Google’s Helpful Content Update and subsequent core updates in 2023-2024 significantly reduced visibility for many small niche sites and personal blogs, some analysts speculate the attribute may currently be used for demotion rather than promotion. This remains speculative — the function is genuinely unknown.
What this means for SEO
If you run a small personal site or niche blog, the existence of this attribute means Google is actively classifying your site type. Focus on demonstrating genuine expertise, building real audience engagement, and accumulating quality backlinks from established sources. The sites that survived the HCU updates typically had strong E-E-A-T signals, real author identities, and genuine user engagement — not just SEO-optimized content.
Demotion Signals: How Google Penalizes
Beyond positive ranking signals, the documents catalog several explicit demotion mechanisms.
anchorMismatchDemotion — triggered when inbound links’ anchor text doesn’t match the destination page’s content. Google evaluates both sides of a link for relevance. If your page about “hiking boots” receives dozens of backlinks with anchor text about “online casino,” the mismatch triggers demotion.
GibberishScore — detects low-quality, artificially generated content. The documentation specifically mentions content created through “low-cost untrained labor, scraping content and modifying and splicing it randomly, and translating from a different language.” Language models and query-stuffing detection help identify unnatural content patterns.
IsAnchorBayesSpam — a flag that identifies spam anchor text patterns. This works alongside anchorMismatchDemotion to evaluate your overall backlink profile for manipulative patterns.
Nav Demotion — penalizes sites with poor navigational experience. Confusing navigation leads to higher bounce rates and makes it harder for Google to crawl and index content effectively. Pages buried deep within submenus may not be indexed at all.
Panda — the documents reveal Panda uses embeddings for content quality assessment and references patents about modifying content rankings based on the number of independent links and NavBoost reference queries. Panda appears to function as a site-level quality modifier rather than a page-level penalty.
Sensitive topic whitelists — the documents reference whitelists for particularly sensitive query categories including elections, COVID-19, and travel. Content in these categories appears to be subject to additional quality filtering.
What this means for SEO
Every demotion signal reinforces the same theme: Google has detection systems for manipulative tactics, and those systems are far more sophisticated than most practitioners assumed. Anchor text manipulation, content spinning, artificial link building, and poor UX all have specific demotion mechanisms. Recovery from gibberish or spam penalties takes 3-6 months or longer, if recovery is even possible.
Link Signals: More Complex Than Expected
The leak confirms that backlinks remain a significant ranking factor — despite Google’s occasional suggestions that links are becoming less important. The documents reveal specific attributes the system evaluates:
Link source quality — the authority and trustworthiness of the linking website. Not all links are equal. A link from an established industry publication carries more weight than a link from a random blog.
Link source diversity — the number of unique referring domains matters more than the total number of links. A hundred links from one site are less valuable than ten links from ten different relevant sites.
Link relevance — Google evaluates whether the linking page is topically relevant to the target page. A link from a running gear review site to your running shoe product page carries more topical relevance than a link from an unrelated site.
Anchor text signals — the text used in the link provides topical context about the target page. But the anchorMismatchDemotion and IsAnchorBayesSpam signals mean over-optimized or mismatched anchor text can trigger penalties.
Link freshness — the documents suggest newer links may carry different weight than older ones. A continuous stream of new links from authoritative sources signals ongoing relevance, while a link profile that stopped growing years ago may signal declining authority.
The documentation also confirms Google uses multiple variants of PageRank — not the single metric that was deprecated from public view. Internal fields include toolbarPageRank, pageRank2, and other variants, each apparently serving different functions within the ranking system.
What this means for SEO
Link building isn’t dead — it’s the specific tactics that have changed. Focus on earning links through genuinely valuable content, digital PR, and authentic industry relationships. Prioritize diversity of referring domains over volume. Ensure anchor text is natural and varied. Avoid any scheme that produces a large volume of links from irrelevant sources with identical anchor text.
Twiddlers: Post-Algorithm Ranking Adjustments
The documents reference “twiddlers” — ranking adjustment functions that run after the primary scoring algorithm (Ascorer) within Google’s Mustang ranking system. Twiddlers can promote or demote pages based on specific signals, effectively fine-tuning the initial ranking output.
NavBoost itself appears to function partly as a twiddler — adjusting rankings after the initial content-and-link-based scoring based on real user engagement data. Other twiddlers may handle specific demotion signals (spam detection, quality filtering) or promotion signals (freshness boosting for QDF queries).
This layered architecture means Google’s ranking isn’t a single formula. It’s a pipeline where content passes through multiple evaluation stages, each of which can modify the page’s final position. Understanding this helps explain why pages sometimes rank well initially and then drop (or vice versa) — different twiddlers may activate as more data accumulates.
Rand Fishkin’s Big Takeaway: Build a Brand
After analyzing the full scope of the leak, Fishkin distilled his strategic advice into a single recommendation that has since become the most widely cited takeaway from the entire event:
“If there was one universal piece of advice I had for marketers seeking to broadly improve their organic search rankings and traffic, it would be: Build a notable, popular, well-recognized brand in your space, outside of Google search.”
This conclusion follows logically from the leaked signals. SiteAuthority rewards established, trusted domains. NavBoost rewards sites that generate consistent positive user engagement. Chrome data validates genuine audience behavior. Author entity recognition rewards known, credible experts. SmallPersonalSite classification distinguishes established brands from anonymous niche sites.
Every signal in the leak tilts the playing field toward brands that people know, seek out, and engage with — not just websites that are technically optimized for search crawlers. This doesn’t mean technical SEO is irrelevant. It means technical SEO is necessary but not sufficient. The sites winning in the long run are the ones building real audience relationships, brand recognition, and trust — signals that are hard to fake and that compound over time.
Practical Implications: What to Do With This Information
Prioritize genuine user satisfaction
NavBoost and Chrome data make user engagement a direct ranking input. Every page should be designed to thoroughly answer the query that brought the user there. Reduce bounce rates not through tricks (scroll hijacking, exit-intent popups) but through content that genuinely meets user needs. Track engagement metrics in your own analytics and treat declining engagement as an early warning for potential ranking drops.
Build topical authority systematically
SiteFocusScore and SiteRadius reward depth over breadth. Create comprehensive content clusters around your core topics. Avoid publishing unrelated content that dilutes your topical identity. When expanding into new topics, build bridges through content that logically connects the new subject to your established expertise.
Invest in brand building outside of Google
Fishkin’s advice isn’t abstract — it’s supported by the leaked signals. PR, speaking engagements, industry awards, podcast appearances, social media presence, and community participation all generate the brand recognition signals that feed siteAuthority, entity recognition, and the trust metrics that differentiate established brands from anonymous websites.
Maintain content freshness where it matters
Check whether your target queries trigger QDF (trending topics, recurring events, rapidly changing fields). For those queries, regular content updates with genuinely new information are essential. For evergreen topics, update when the content actually becomes outdated — not on an arbitrary schedule.
Build a natural, diverse link profile
Earn links from multiple relevant domains through valuable content, original data, and authentic industry relationships. Monitor your anchor text distribution for unnatural patterns. Avoid link schemes that produce volume without relevance or diversity.
Establish author entities
Create consistent author profiles across your website, social platforms, and industry publications. Use Person schema markup. Build a verifiable body of published work that demonstrates expertise in your subject area. Google’s entity recognition systems are watching.
Accept the sandbox period for new sites
New domains will face reduced visibility regardless of optimization quality. Plan for a 6-18 month ramp period. Focus early efforts on building brand signals, earning initial authoritative links, and creating a foundation of quality content rather than expecting immediate ranking results.
Monitor for demotion signals
Audit your backlink profile for anchor text mismatches and spam patterns. Review your content for gibberish scores — particularly if you’ve used translation, content spinning, or low-quality outsourced writing. Ensure your site navigation is clear and that important pages aren’t buried more than three clicks from the homepage.
What the Leak Doesn’t Tell Us
The limitations of this leak are as important as its revelations. The documents don’t reveal the weights assigned to each signal — we don’t know whether NavBoost is 10x more important than siteAuthority or vice versa. They don’t confirm which attributes are currently active versus deprecated. They don’t explain how signals interact — whether certain signals can override others, or whether there are threshold effects where a signal only matters once it exceeds a certain level.
Google’s caveat that the documents may be “outdated” is plausible — the most recent internal date reference suggests the documentation was current as of approximately August 2023. Google’s systems evolve continuously, and specific attribute names, weights, or implementations may have changed since then.
What the documents do confirm is the scope and direction of Google’s evaluation system. The fundamental signals — site authority, user engagement, content quality, link analysis, topical authority, entity recognition — are structural to how Google assesses the web. Even if specific implementations change, these categories of evaluation are unlikely to disappear.
Frequently Asked Questions
Does the leak prove that Google lied about its ranking algorithm?
The documents reveal clear contradictions between Google’s public statements and its internal systems — particularly regarding siteAuthority, click data usage, Chrome data integration, and the sandbox. Whether this constitutes “lying” or “strategic omission” is a matter of perspective. Google’s stated reason for not confirming these signals — preventing manipulation — is understandable from their position. But for SEO practitioners who made strategic decisions based on Google’s public guidance, the contradictions are significant.
Are the leaked documents still relevant in 2026?
The core signal categories — authority, engagement, freshness, topical relevance, link quality — are structural to how search ranking works. Specific attribute names or weights may have evolved since the documents were current (approximately August 2023), but the fundamental architecture Google uses to evaluate websites is unlikely to have changed at its foundation. The independent confirmation of NavBoost through the antitrust trial strengthens the documents’ ongoing relevance.
Should I change my SEO strategy based on the leak?
If your strategy was already focused on creating genuinely useful content, building topical authority, earning natural backlinks, and providing good user experiences, the leak validates your approach. If your strategy relied on tactics that Google publicly said were fine but the leak reveals are monitored for manipulation (aggressive anchor text optimization, click manipulation, cosmetic date updates), you should adjust.
How does siteAuthority differ from Moz’s Domain Authority?
Moz’s Domain Authority is a third-party metric calculated using Moz’s own methodology. Google’s siteAuthority is an internal metric calculated by Google’s own systems. The inputs, calculation methods, and weights are different. They’re conceptually related — both attempt to measure a domain’s overall strength — but they’re not the same metric and shouldn’t be treated as interchangeable.
Is Google’s sandbox a permanent barrier for new sites?
No. The hostAge attribute indicates differential treatment for new domains, not permanent exclusion. The sandbox appears to function as a probationary period where Google requires additional evidence of legitimacy before granting full ranking access. Building genuine brand signals, earning authoritative links, and publishing quality content during this period helps establish the trust signals needed to exit sandbox treatment. Practitioners estimate this period typically lasts 6-18 months for competitive queries.
What was the most important finding from the leak?
Industry consensus centers on NavBoost and the confirmation that user click data is a core ranking signal. This single finding reframes how SEO practitioners should think about optimization — not just making pages that search engines can crawl, but making pages that users genuinely want to engage with. The antitrust trial’s independent confirmation of NavBoost’s importance makes it the highest-confidence finding from the entire leak.
AhrefsBot can be blocked through robots.txt, .htaccess rules, Nginx server configs, Cloudflare WAF rules, or direct IP-range blocking. Each method offers a different level of enforcement — robots.txt asks politely, while IP-based firewall rules shut the door completely. The right choice depends on why you want to block it and how strict you need to be.
This guide walks through every method step by step, explains the trade-offs of each, and covers a scenario most articles skip: how to verify you’re actually dealing with the real AhrefsBot before you start blocking anything.
What AhrefsBot Actually Does (And What AhrefsSiteAudit Is)
Ahrefs runs two separate crawlers, and the distinction matters when you’re deciding what to block.
AhrefsBot is the main crawler. It follows links across the web, records backlink relationships, anchor texts, on-page content, and internal link structures. All of that data feeds into Ahrefs’ core tools — Site Explorer, Keywords Explorer, Content Explorer — and also powers Yep.com, the search engine Ahrefs launched. According to Cloudflare Radar data, AhrefsBot is the single most active SEO crawler on the internet, second only to Googlebot among all web crawlers. It visits over 8 billion pages every 24 hours and updates its index roughly every 15 to 30 minutes.
AhrefsSiteAudit is a separate crawler with its own user-agent string. It powers the Site Audit feature inside Ahrefs, which site owners use to find technical SEO issues on their own domains. If you run audits through Ahrefs Webmaster Tools (which is free), this is the bot doing the crawling.
Why does this matter? Because you might want to block the global crawler (AhrefsBot) to keep competitors out of your backlink data, while still allowing AhrefsSiteAudit so you can run your own technical audits. Or vice versa. Blocking both with a blanket rule when you only meant to target one is a common mistake.
Keep these in mind — you’ll need them for the blocking methods below.
Verify Before You Block: Is It Really AhrefsBot?
Before setting up any blocking rules, confirm that the traffic claiming to be AhrefsBot is actually coming from Ahrefs. User-agent strings can be spoofed. Scrapers, bad bots, and even competitors sometimes disguise themselves as known crawlers to slip past security rules.
Ahrefs makes verification straightforward because they publish their full IP ranges and support reverse DNS lookups.
Step 1: Check the IP Against Ahrefs’ Published Ranges
Ahrefs maintains a public list of all IP ranges used by both AhrefsBot and AhrefsSiteAudit. You can pull these as JSON or plain text from their help center at ahrefs.com/robot. The crawlers operate from data centers in Singapore, the United Kingdom, France, Canada, and Germany.
If the IP hitting your server isn’t in any of these ranges, it’s not AhrefsBot — regardless of what the user-agent says.
Step 2: Run a Reverse DNS Lookup
For additional confirmation, do a reverse DNS lookup on the source IP. Legitimate AhrefsBot traffic will always resolve to a hostname ending in ahrefs.com or ahrefs.net.
dig -x 51.89.129.45 +short
If the result comes back with an Ahrefs hostname, run a forward lookup to confirm the match:
dig crawl-51-89-129-45.ahrefs.com +short
The forward result should return the same IP. If either check fails, the traffic is spoofed.
Step 3: Use Cloudflare’s Verified Bot List
If your site sits behind Cloudflare, you get an extra shortcut. Both AhrefsBot and AhrefsSiteAudit are recognized as verified “good” bots in Cloudflare’s bot ecosystem. This means Cloudflare can automatically distinguish real Ahrefs traffic from spoofed traffic in your WAF logs and analytics — no manual DNS lookups required.
Why You Might Want to Block AhrefsBot
Most website owners considering a block fall into one of three camps.
Server Performance
AhrefsBot is aggressive. On shared hosting or resource-constrained servers, its crawl bursts — sometimes hundreds of URLs in quick succession — can compete with real visitors for bandwidth and processing power. If your Time to First Byte spikes during bot activity, that slowdown affects both user experience and Core Web Vitals, which Google does use as a ranking factor.
For sites on higher-end hosting, this is rarely an issue. But budget WordPress installs, small Shopify stores on basic plans, and sites without CDN caching feel the impact.
Competitive Intelligence Protection
Every page AhrefsBot crawls becomes part of Ahrefs’ database. Any paying Ahrefs subscriber can then pull up your backlink profile, see which keywords you rank for, analyze your content strategy, identify your linking patterns, and reverse-engineer what’s working. For businesses in competitive niches — affiliate SEO, SaaS, fintech, e-commerce — that level of transparency can be a strategic liability.
Ahrefs’ own research across approximately 140 million websites found that about 6.31% of all sites block AhrefsBot, making it the third most blocked SEO crawler behind MJ12bot (Majestic) at 6.49% and SemrushBot at 6.34%.
Policy or Compliance Requirements
Some organizations — particularly in finance, healthcare, and government sectors — have blanket policies against non-essential automated crawlers. If your security team classifies all third-party data collectors as unnecessary risk, blocking AhrefsBot becomes a compliance checkbox rather than a strategic decision.
Method 1: Block AhrefsBot via Robots.txt
This is the easiest method and where most site owners should start. AhrefsBot respects robots.txt directives — Ahrefs explicitly documents this on their official bot page.
Full Site Block
Add these lines to your robots.txt file (located in your site’s root directory):
This approach keeps your backlink data visible in Ahrefs (useful for your own analysis and for agencies reviewing your site) while protecting directories that shouldn’t appear in any third-party tool.
Throttle with Crawl-Delay
Rather than blocking entirely, you can slow AhrefsBot down. The crawl-delay directive tells the bot to wait a set number of seconds between consecutive requests:
User-agent: AhrefsBot
Crawl-delay: 10
A value of 10 means AhrefsBot waits at least 10 seconds before requesting the next page. Most site owners set this between 5 and 20 seconds depending on server capacity.
One nuance worth knowing: Ahrefs documents that crawl-delay is honored for HTML page requests, but when the bot renders pages and fetches associated assets — CSS, JavaScript, images — you may still see multiple requests clustered together in your logs. That doesn’t mean the bot is ignoring your directive. It’s the difference between page requests and asset requests.
Recommended Default Config
For most websites, a combined approach works well:
This setup slows down the main crawler, protects sensitive directories, and still allows you to run your own Site Audit through Ahrefs Webmaster Tools.
Important: If your robots.txt has syntax errors — missing colons, incorrect spacing, wrong capitalization in the user-agent name — AhrefsBot may not recognize your directives and will continue crawling as normal. Validate your robots.txt file before assuming it’s working.
Method 2: Block via .htaccess (Apache Servers)
Robots.txt is a polite request. The bot has to choose to obey it. If you need server-level enforcement — where requests get rejected before they reach your content — .htaccess rules on Apache servers are the next step up.
Block by User-Agent
RewriteEngine On
RewriteCond %{HTTP_USER_AGENT} AhrefsBot [NC]
RewriteRule .* - [F,L]
This returns a 403 Forbidden response to any request with “AhrefsBot” in the user-agent string. The [NC] flag makes the match case-insensitive.
To block both Ahrefs crawlers in one rule:
RewriteEngine On
RewriteCond %{HTTP_USER_AGENT} (AhrefsBot|AhrefsSiteAudit) [NC]
RewriteRule .* - [F,L]
Block by IP Range
For stricter enforcement, block the actual IP ranges Ahrefs crawls from. This works even if someone spoofs the user-agent:
<RequireAll>
    Require all granted
    Require not ip 5.39.1.224/27
    Require not ip 51.89.129.0/24
    Require not ip 51.161.37.0/24
    Require not ip 51.195.183.0/24
    Require not ip 15.235.27.0/24
    Require not ip 15.235.96.0/24
    Require not ip 15.235.98.0/24
    Require not ip 176.31.139.0/27
</RequireAll>
Pull the complete, current list from Ahrefs’ help center before deploying — they occasionally add or adjust ranges.
Method 3: Block via Nginx Server Config
If your server runs Nginx instead of Apache, you won’t have an .htaccess file. Here’s how to achieve the same result.
Block by User-Agent
if ($http_user_agent ~* "AhrefsBot") {
    return 403;
}
Place this inside your server block in the Nginx config file.
To block multiple SEO crawlers at once:
if ($http_user_agent ~* "(AhrefsBot|AhrefsSiteAudit|SemrushBot|MJ12bot)") {
    return 403;
}
After editing, reload Nginx for changes to take effect:
sudo nginx -t
sudo systemctl reload nginx
Method 4: Block via Cloudflare or CDN-Level WAF
If your site uses Cloudflare (or a similar CDN with WAF capabilities), you can block AhrefsBot before traffic even reaches your origin server. This is the most resource-efficient approach because your server never has to process the request at all.
Create a Custom Firewall Rule
In Cloudflare:
Go to Security > WAF > Custom rules
Click Create rule
Name it something clear — “Block AhrefsBot”
In the Expression Editor, enter: (http.user_agent contains "AhrefsBot")
Set the action to Block
Deploy
To block by IP ranges instead (stronger enforcement against spoofed user-agents), use the expression:
(ip.src in {5.39.1.224/27 51.89.129.0/24 51.161.37.0/24 51.195.183.0/24})
A Note on Bot Fight Mode
Cloudflare’s Bot Fight Mode may automatically challenge or block AhrefsBot depending on your settings. However, since Ahrefs is classified as a verified bot in Cloudflare’s system, Bot Fight Mode typically won’t interfere with it unless you’ve set up additional custom rules. Check your Cloudflare analytics under Security > Bots to see how AhrefsBot traffic is being handled.
Method 5: Use Ahrefs Webmaster Tools to Control Crawl Rate
This one doesn’t involve blocking at all — and many site owners don’t know it exists.
If you verify your site in Ahrefs Webmaster Tools (free for any site owner), you get access to a crawl rate adjustment dashboard. This lets you set a custom crawl frequency that matches your server capacity, giving you more precise control than a robots.txt crawl-delay directive.
Ahrefs Webmaster Tools also participates in the IndexNow protocol through Yep.com. When you update content, you can notify Ahrefs directly rather than waiting for the bot to discover changes on its own schedule. This means you can run a slower overall crawl rate without sacrificing data freshness on the pages that matter most.
To set this up:
Go to ahrefs.com/webmaster-tools
Verify your site ownership (DNS, HTML file, or meta tag)
Navigate to the crawl settings for your verified project
Adjust the crawl speed to your preference
This is the ideal solution for site owners who want accurate data in Ahrefs but need to manage server load.
WordPress-Specific Options
If you’re running WordPress and not comfortable editing server config files directly, a few approaches work well.
Edit robots.txt through Yoast SEO or Rank Math: Both plugins let you edit your robots.txt file from the WordPress dashboard. Go to Yoast > Tools > File Editor, or Rank Math > General Settings > Edit robots.txt, and add your AhrefsBot directives there.
Use a bot-blocking plugin: The Htaccess by BestWebSoft plugin includes a User-Agent Blocking field where you can enter bot names (AhrefsBot, SemrushBot, MJ12bot) one per line. The plugin generates the .htaccess rules automatically — no manual file editing required.
Managed WordPress hosts: Some managed hosting providers (Cloudways, Kinsta, WP Engine) include server-level bot management in their dashboards. Check your host’s documentation before adding redundant rules.
Why Your AhrefsBot Block Might Not Be Working
You’ve added the rules, but your server logs still show AhrefsBot requests. Here’s what’s usually going on.
Robots.txt Changes Aren’t Instant
AhrefsBot doesn’t check your robots.txt file with every single request. It fetches and caches the file periodically, then follows those rules until the next check. After updating your robots.txt, it may take anywhere from hours to a few days before AhrefsBot picks up the changes on its next scheduled crawl.
You Blocked AhrefsBot but Not AhrefsSiteAudit
These are two different crawlers with two different user-agent strings. If you only added a rule for User-agent: AhrefsBot, AhrefsSiteAudit will continue crawling normally. If you’re seeing continued Ahrefs traffic after blocking the main bot, check whether the user-agent in your logs says AhrefsSiteAudit instead.
Crawl-Delay Looks Broken in Raw Logs
When AhrefsBot renders a page, it fetches the HTML and then pulls associated assets — stylesheets, scripts, images. The crawl-delay applies to HTML page requests, not asset requests. So your logs might show a cluster of 10-15 requests within a second, but only one of those is an actual page crawl. The rest are resource fetches. This is documented behavior, not a violation of your crawl-delay directive.
Syntax Errors in Robots.txt
A missing colon after User-agent, an extra space before Disallow, or a misspelled bot name will cause the directive to be silently ignored. Ahrefs warns that their bots cannot parse malformed robots.txt files. Use a robots.txt validator (Google Search Console has one, or use an online tool) to check for syntax issues.
Someone Is Spoofing the AhrefsBot User-Agent
If you’ve confirmed there are no syntax errors and the crawl is coming from IPs outside Ahrefs’ published ranges, you’re not dealing with the real AhrefsBot. A scraper or bad bot is using the Ahrefs user-agent as camouflage. In this case, user-agent blocking won’t help — you need IP-based blocking or WAF rules.
The Trade-Offs: What You Lose When You Block AhrefsBot
Blocking works. But it comes with costs that are worth understanding before you commit.
Your Ahrefs Data Goes Stale
The moment AhrefsBot stops crawling your site, your domain’s data in Ahrefs freezes. Backlink counts stop updating, new links won’t appear, keyword ranking data becomes less accurate, and anyone using Ahrefs to evaluate your site — potential link partners, agencies, investors doing due diligence — will see incomplete information.
Your site doesn’t disappear from Ahrefs entirely. The platform still picks up backlinks from the linking side (when other sites that do allow AhrefsBot link to you, those links still get recorded). But the data becomes progressively less reliable over time.
Site Audit Stops Working
If you block AhrefsSiteAudit along with AhrefsBot, you lose the ability to run free technical audits through Ahrefs Webmaster Tools. For teams that rely on Ahrefs for crawl error detection, broken link monitoring, or Core Web Vitals tracking, this is a meaningful loss.
You Only Block One Tool
Blocking AhrefsBot doesn’t block SemrushBot, MJ12bot (Majestic), DotBot (Moz), or any of the other SEO crawlers that collect similar data. If competitive privacy is your goal, you’d need to block multiple crawlers to make a real difference. And even then, tools have other data sources — clickstream data, SERP scraping, Chrome extension data — that don’t depend on crawling your site directly.
Your Site Disappears from Yep.com
AhrefsBot currently powers the index for Yep.com, the search engine Ahrefs built. Blocking the bot means your pages won’t appear in Yep search results. For most sites, Yep traffic is negligible today. But it’s worth knowing the connection exists.
When Blocking Actually Makes Strategic Sense
Full AhrefsBot blocking makes sense in a limited set of scenarios:
Small sites on tight server budgets where even moderate bot traffic causes measurable slowdowns for real users. If you’re on a $5/month shared hosting plan and AhrefsBot crawl bursts are spiking your TTFB, blocking is a reasonable trade-off.
Private or internal projects — staging environments, internal tools, client portals — that should never appear in any third-party database.
PBN operators and affiliate SEO practitioners who actively want to prevent competitors from mapping their link networks. This is the most common deliberate use case in competitive SEO.
Organizations with strict security policies that prohibit all non-essential automated access by default.
For most public-facing websites, the better move is throttling (crawl-delay) combined with path-specific blocking. You keep your Ahrefs data fresh, protect sensitive directories, and reduce server load — without the downsides of a full block.
AhrefsBot in the Context of 2026 Bot Management
Blocking AhrefsBot in 2026 is one piece of a much bigger bot management picture. The landscape has shifted dramatically with the arrival of AI training crawlers.
GPTBot (OpenAI), ClaudeBot (Anthropic), Google-Extended, CCBot (Common Crawl), and Meta-ExternalAgent now generate substantial traffic to most websites. According to Cloudflare’s Q1 2026 robots.txt analysis, GPTBot is the most blocked AI crawler, and the total volume of AI crawler traffic has grown significantly compared to traditional SEO bots.
The important distinction for site owners: SEO crawlers like AhrefsBot index your content and make it discoverable (in Ahrefs, in Yep.com). AI training crawlers ingest your content to build language models — they take but don’t send traffic back. The crawl-to-referral ratio tells the story: AI training bots consume far more resources per referral visit they generate compared to SEO crawlers.
If you’re updating your robots.txt to block AhrefsBot, it’s worth auditing your bot rules more broadly. Many site owners in 2026 are adopting a split strategy: allow SEO crawlers (or throttle them), allow AI search retrieval bots (like OAI-SearchBot and PerplexityBot that drive referral traffic), but block AI training crawlers that only harvest content without returning visitors.
Your robots.txt is no longer a file you set once and forget. It’s a living access policy that needs periodic review.
Frequently Asked Questions
Does blocking AhrefsBot hurt my Google rankings?
No. AhrefsBot is completely separate from Googlebot. Blocking it has zero direct impact on how Google crawls, indexes, or ranks your pages. The indirect risk is that you lose access to Ahrefs’ SEO data for your own site, which could make it harder to monitor and improve your SEO performance over time.
Can I block AhrefsBot but still use Ahrefs to analyze my own site?
Partially. If you block AhrefsBot but allow AhrefsSiteAudit, you can still run Site Audit on your verified domains through Ahrefs Webmaster Tools. However, your Site Explorer data (backlinks, organic keywords, traffic estimates) will become stale because that data comes from the main AhrefsBot crawler.
How long does it take for AhrefsBot to stop crawling after I update robots.txt?
There’s no fixed timeline. AhrefsBot fetches and caches your robots.txt file periodically. Changes typically take effect within a few hours to a few days, depending on how frequently the bot is scheduled to revisit your domain. For immediate enforcement, use server-level or firewall-level blocking instead.
Should I block SemrushBot and MJ12bot at the same time?
That depends on your goals. If competitive privacy is the reason, blocking only AhrefsBot while leaving SemrushBot and MJ12bot open doesn’t accomplish much — your competitors can just use those tools instead. If server load is the concern, prioritize blocking the bots that hit your site hardest, which you can identify by reviewing your server access logs.
Is blocking AhrefsBot by user-agent enough, or do I need IP blocking too?
User-agent blocking works for the real AhrefsBot because it honestly identifies itself. But user-agent strings can be spoofed by scrapers and bad bots. If you need enforcement against spoofed requests — or if you’re in an environment where you can’t rely on voluntary compliance — IP-range blocking is the stronger option. Ahrefs publishes their full IP list specifically for this purpose.
What’s the difference between blocking via robots.txt and blocking via .htaccess or firewall?
Robots.txt is a voluntary protocol. It asks bots to stay away, and well-behaved bots (including AhrefsBot) comply. But it consumes no server resources only if the bot actually reads and obeys the file. Server-level blocking (.htaccess, Nginx config) and firewall blocking (Cloudflare WAF) reject the connection at a lower level — the bot’s request is denied before your site processes it, saving server resources. The trade-off is that server and firewall rules require more technical setup and maintenance, especially if Ahrefs updates their IP ranges.
Google uses hundreds of signals to decide which pages appear in search results and in what order. For most of SEO’s history, the specific signals were a matter of informed speculation — practitioners tested, observed, and theorized based on limited public guidance from Google.
That changed in May 2024 when 14,014 internal API attributes leaked from Google’s Content Warehouse. The same year, the DOJ antitrust trial forced Google executives to testify under oath about how their ranking systems work. For the first time, we have evidence — not just Google’s public statements, but their internal documentation and sworn testimony — about which signals exist and how they function.
This guide focuses on the ranking factors that are either confirmed by the leak, verified through the antitrust trial, or officially stated by Google. Where a factor is speculated but unconfirmed, that’s noted. The goal isn’t a list of 200 items you’ll never remember — it’s the factors that actually move rankings in 2026, organized by how much evidence supports them.
The Factors Confirmed by the 2024 API Leak and Antitrust Trial
Before covering the full landscape, it’s worth isolating the signals that the leak and trial specifically confirmed — because several of these directly contradict years of public statements by Google engineers.
siteAuthority
Google denied for over a decade that it calculates or uses any kind of domain-level authority metric. The leaked documents contain a siteAuthority integer field within the CompressedQualitySignals module that functions as a persistent, composite score applied at the site or sub-domain level. It serves as a foundational input for preliminary ranking in Google’s Mustang system.
This doesn’t mean Google’s siteAuthority is identical to third-party “Domain Authority” metrics from Moz or Ahrefs. The internal calculation methodology isn’t documented. But the concept — that Google evaluates sites at the domain level, not just individual pages — is confirmed.
NavBoost
NavBoost is Google’s click-driven re-ranking system. It was mentioned 84 times in the leaked documents and independently confirmed under oath by Google VP Pandu Nayak during the antitrust trial, where he called it “one of the most important” ranking signals.
Google publicly denied using click data for rankings for years. NavBoost tracks goodClicks (satisfied clicks with long dwell time), badClicks (quick returns to search results), lastLongestClicks (the final result a user clicked and stayed on), and unsquashedClicks (clicks deemed genuine). It operates on a rolling 13-month window and is region-specific.
NavBoost effectively means that user satisfaction with your page — measured through real click behavior — is a direct ranking input, not just a correlated metric.
chromeInTotal
Google representatives, including Matt Cutts and John Mueller, stated publicly that Google does not use Chrome browser data for rankings. The leaked documents contain a chromeInTotal attribute that captures site-level views from Chrome browsers. Additional attributes track Chrome user behavior including time on page, bounce patterns, and browsing frequency.
With Chrome holding approximately 65% of global browser market share, this gives Google access to a massive behavioral dataset that no other search engine can replicate.
OriginalContentScore and contentEffort
The leak revealed an OriginalContentScore that evaluates content uniqueness, particularly for shorter content (scored 0-512). A related contentEffort attribute appears to use large language models to estimate the effort required to create an article — helping Google distinguish between content requiring genuine expertise and content that was assembled by scraping, translating, or algorithmically remixing existing material.
hostAge (Sandbox)
Google denied the existence of a “sandbox” for new websites since the mid-2000s. The leaked PerDocData module contains a hostAge attribute described as being used to identify and handle “fresh spam during serving time.” This confirms that new domains receive different treatment — reduced ranking capability — during an initial period after creation.
smallPersonalSite
An attribute called smallPersonalSite exists in the documentation. Its function is unknown — it could promote or demote small personal sites. Given that Google’s Helpful Content Update and subsequent core updates significantly reduced visibility for many small niche sites, some analysts speculate it’s currently used for demotion. This remains unconfirmed.
Content Quality and Information Gain
Content quality has been a ranking factor since Google existed. What’s changed in 2026 is how quality is measured and what “quality” means in an environment where AI can generate passable content on any topic in seconds.
The Information Gain Threshold
The most important content differentiation factor in 2026 is information gain — publishing something that didn’t exist before you published it. This includes original data from your own research or business operations, first-hand experience with products, services, or processes, expert analysis that synthesizes information in a new way, proprietary frameworks or methodologies, and primary source reporting.
AI-generated content can competently summarize existing information. What it can’t do is create new information from real-world experience. The contentEffort attribute in the leak suggests Google is actively trying to measure this distinction. Content that clearly required human expertise, original research, or direct experience to create scores differently from content that could have been assembled by an algorithm.
This doesn’t mean AI-assisted content is automatically penalized. Google’s official guidance states that AI-generated content is acceptable if it’s helpful and demonstrates E-E-A-T. But content that adds nothing new to what’s already indexed — regardless of whether a human or AI wrote it — is at a structural disadvantage for ranking.
E-E-A-T isn’t a direct ranking factor — it’s a framework Google uses to train its quality raters, whose evaluations inform algorithm development. But the leaked documents confirm that several E-E-A-T components have direct algorithmic representation.
Experience — the first “E,” added in December 2022 — evaluates whether the content creator has firsthand experience with the subject. Original product photography, staff-written reviews, personal case studies, and “tested by our team” content all demonstrate real experience. The leak’s author-entity recognition attributes connect directly to this signal.
Expertise — demonstrated through depth of knowledge, accurate technical details, and qualifications. Author profiles with verifiable credentials, detailed technical content, and cited sources strengthen expertise signals.
Authoritativeness — earned through external validation. Quality backlinks, citations from trusted publications, industry recognition, and consistent brand presence build authority. The siteAuthority metric confirmed in the leak reflects the algorithmic representation of this concept.
Trustworthiness — the most critical component, according to Google’s documentation. Secure site (HTTPS), clear contact information, transparent editorial policies, accurate sourcing, and visible privacy policies build trust. Google states explicitly: “untrustworthy pages have low E-E-A-T no matter how Experienced, Expert, or Authoritative they may seem.”
E-E-A-T carries extra weight for YMYL (Your Money or Your Life) topics — content about health, financial decisions, safety, or civic information where inaccurate content could cause real harm.
Search Intent Alignment
Search intent — whether the user wants to learn, compare, buy, or navigate — is the foundational relevance signal. A technically perfect page will fail to rank if it doesn’t match what the user is actually looking for.
Google’s algorithms now evaluate intent alignment at three levels (sometimes called the “3 Cs”): content type (is it a blog post, product page, or video?), content format (is it a how-to guide, a listicle, a comparison, or a review?), and content angle (what’s the unique perspective or hook?).
The practical test: search your target keyword and study the top 5 results. If they’re all comparison articles and you’re publishing a product page, you have an intent mismatch. If they’re all long-form guides and you’re publishing a 200-word summary, your format doesn’t match. Aligning with the dominant intent pattern in current results is the baseline requirement for ranking.
Title tags and meta descriptions serve as the interface between your content and the search results page. The leaked TitleMatchScore attribute confirms Google measures how well your title matches user queries. Place your primary keyword near the front of the title, keep it under 60 characters, and write a meta description that accurately previews the page content with a clear reason to click.
Backlinks and Link Authority
The 2024 leak confirmed that backlinks remain a significant ranking factor. The siteAuthority attribute itself is built partly from link signals. Despite Google’s occasional suggestions that links are becoming less important, every piece of evidence — the leak, the antitrust trial testimony, and observable ranking patterns — indicates links still carry substantial weight.
What the Leak Tells Us About Links
Google evaluates links across multiple dimensions: the authority of the linking domain, the topical relevance of the linking page to the target page, anchor text signals (with demotion for mismatched or spammy anchors), link diversity (unique referring domains matter more than total link count), and link freshness (a continuous stream of new links signals ongoing relevance).
The anchorMismatchDemotion attribute penalizes pages receiving links with anchor text that doesn’t match the page’s content. The IsAnchorBayesSpam flag detects spam anchor text patterns. Over-optimized anchor text distribution — too many exact-match anchors — is a demotion trigger.
Natural Anchor Text Distribution
Based on analysis of top-ranking pages, a natural anchor text profile typically includes approximately 50% branded anchors (your company or site name), 25% topically relevant anchors (contextual terms related to your content), 15% generic anchors (“click here,” “learn more,” “this article”), and 10% or less target keyword variations (exact match and phrase match combined).
Pages with an unnatural concentration of exact-match anchor text — especially if acquired in a short timeframe — trigger manipulation flags. Link velocity (the rate at which you acquire new links) should be consistent with your site’s organic growth pattern. Sudden spikes in link acquisition with similar anchor text are a red flag.
Topical Authority and Site Focus
The leaked SiteFocusScore and SiteRadius attributes confirm that Google evaluates topical authority at the site level, not just the page level.
SiteFocusScore measures how concentrated your site’s content is around specific topics. SiteRadius measures how far individual page embeddings drift from the overall site embedding. Together, they reward sites with clear thematic identity and penalize sites that publish widely unrelated content.
This explains why niche sites often outrank larger generalist sites for specific queries — a tighter SiteFocusScore sends a stronger topical signal. It also explains why randomly publishing content outside your core topic area can dilute your ranking power across the board.
The practical application is the pillar-cluster content model: build comprehensive coverage of your core topics through interconnected content, then expand into adjacent topics only when you can create logical thematic bridges.
Internal Linking
Internal linking doesn’t get its own named attribute in the leak, but its importance is well-established through multiple mechanisms. Internal links distribute link equity across your site. They help search engines understand content relationships and hierarchy. They signal which pages you consider most important. And they create navigation paths that affect user engagement metrics.
A SearchPilot split test found that adding internal links to a homepage footer produced a 5% uplift in organic traffic to the linked pages, with desktop traffic jumping 10%. Another test showed that simply changing the anchor text of existing internal links — without adding or removing any links — produced a statistically significant positive result for the destination pages.
For ecommerce and content-heavy sites, internal linking is one of the highest-leverage optimization activities available because it’s entirely within your control and can be implemented at scale.
User Engagement and NavBoost
NavBoost transforms user engagement from a correlated metric into a confirmed ranking input. The system tracks click quality across a 13-month rolling window, which means pages need to satisfy users consistently — a viral spike decays as old click data rolls out, while pages that reliably satisfy searchers accumulate positive signals over time.
The practical implications: your title tag and meta description are ranking assets because they earn the initial click that starts the NavBoost record. Your content quality determines whether that click becomes a goodClick (user stayed, engaged) or a badClick (user bounced back to results). And your page’s position as the lastLongestClick in a session — the result that ended the user’s search — is a particularly strong satisfaction signal.
Pogo-sticking — users clicking your result, bouncing back to the SERP, and clicking a competitor’s result — sends a clear negative signal. The best defense against pogo-sticking is matching content to search intent, answering the query immediately (don’t bury the answer below a wall of preamble), and providing enough depth that the user doesn’t need to continue searching.
Page Experience and Core Web Vitals
Google confirmed Core Web Vitals as ranking signals in 2021. In 2026, the three metrics are:
Largest Contentful Paint (LCP) — loading speed. Target: under 2.5 seconds. The LCP element is typically the largest image or text block in the viewport.
Interaction to Next Paint (INP) — interactivity. Replaced First Input Delay (FID) in March 2024. Target: under 200 milliseconds. Measures how quickly the page responds to user interactions throughout the visit, not just the first one.
Cumulative Layout Shift (CLS) — visual stability. Target: under 0.1. Measures unexpected content shifts during page load.
Core Web Vitals are confirmed ranking factors but carry relatively low weight compared to content quality and links. Google has described them as a “tiebreaker” — when two pages are otherwise similar in quality and relevance, the one with better page experience wins. Their larger impact is indirect: poor page performance causes bad user engagement signals (high bounce rates, short dwell times) that feed into NavBoost.
HTTPS is a confirmed but lightweight ranking signal — Google stated it affects less than 1% of global queries. Mobile-first indexing means Google evaluates the mobile version of your site for ranking purposes. Responsive design is Google’s recommended approach.
Content Freshness
The leaked documents reveal three freshness signals: bylineDate (stated publication date), syntacticDate (date in the URL or title), and semanticDate (estimated date based on content context). A lastSignificantUpdate attribute appears to detect cosmetic date changes versus substantive content updates.
Freshness matters primarily for queries where timeliness is relevant — Google’s Query Deserves Freshness (QDF) algorithm boosts recent content for trending topics, breaking news, and rapidly changing subjects. For evergreen topics (“how does photosynthesis work”), freshness carries minimal weight.
When updating content, aim for roughly 30% substantive change: cut outdated sections, add new data and examples, update recommendations, and include information that didn’t exist when the page was originally published. Changing only the byline date is detectable and may be downweighted.
Brand Signals
After analyzing the full API leak, Rand Fishkin’s strategic conclusion was direct: “If there was one universal piece of advice I had for marketers seeking to broadly improve their organic search rankings and traffic, it would be: Build a notable, popular, well-recognized brand in your space, outside of Google search.”
This conclusion follows from multiple leaked signals. SiteAuthority rewards established, trusted domains. NavBoost rewards sites that generate consistent positive engagement — and branded searches (people searching for your company name) produce some of the highest-quality click signals possible. ChromeInTotal captures direct traffic and repeat visits. Author entity recognition rewards known, credible experts.
Building brand signals means investing in activities that don’t look like traditional SEO: PR coverage, industry events, podcast appearances, social media presence, community building, and customer experience. These generate the brand recognition that feeds the algorithmic signals Google actually measures.
Local SEO Ranking Factors
Local search uses additional ranking signals beyond the standard organic factors.
NAP consistency — your business Name, Address, and Phone number should be identical across your website, Google Business Profile, directories, and social profiles. Inconsistent NAP data fragments your business identity in Google’s view. Businesses with consistent NAP data are 40% more likely to appear in the local pack.
Google Business Profile — your primary local SEO asset. Complete every field, respond to reviews, post regular updates, and ensure your business categories accurately reflect your services.
Customer reviews — reviews account for approximately 9% of local pack ranking factors. Volume, recency, diversity, and sentiment all matter. Responding to reviews increases conversion rates — each 25% increase in response rate produces a 4.1% improvement in conversion.
LocalBusiness schema markup — structured data that tells search engines your business name, address, hours, service area, and other operational details. Properly implemented schema enables rich results in search listings.
Generative Engine Optimization (GEO): The New Visibility Dimension
In 2026, ranking on the traditional SERP is only half the visibility equation. AI Overviews now appear on approximately 48% of all queries. Around 60% of searches result in no click at all. Being cited in AI-generated answers — by Google’s AI Overviews, ChatGPT, Perplexity, or Claude — is a separate discipline from traditional ranking.
Research shows the overlap between top-10 Google ranking pages and AI-cited sources has collapsed from approximately 70% to below 20%. Ranking first organically does not guarantee being cited in the AI Overview displayed above your result.
GEO optimization focuses on making your content citable by AI systems: structuring information in extractable chunks (specification tables, comparison charts, concise definitional statements), building entity clarity through consistent naming and schema markup, earning third-party mentions from multiple independent sources, and publishing original data and analysis that AI systems can reference as primary source material.
GEO doesn’t replace SEO — it builds on the same fundamentals (quality content, authority, technical health). But it adds a new layer of optimization focused on how AI systems retrieve, evaluate, and cite information rather than how traditional search algorithms rank pages.
Factors That Don’t Matter (Despite Common Belief)
Clearing up misconceptions is as important as identifying what works. The following factors are commonly cited in SEO discussions but have no confirmed impact on rankings:
Keyword density — Google does not use a target keyword density percentage. Using your keyword naturally is sufficient. Stuffing keywords harms readability and can trigger spam detection.
Word count — Google does not rank pages based on length. A 500-word article that perfectly answers a query can outrank a 5,000-word article that doesn’t. The leaked OriginalContentScore evaluates originality, not length.
Social media signals — Google has stated that social shares, likes, and followers are not ranking factors. Social activity can drive traffic and brand awareness, which indirectly affects rankings, but the social metrics themselves are not signals.
Exact-match domains — owning an exact-match domain (e.g., bestrunningshoes.com) provided a ranking advantage in Google’s early years. This benefit was largely eliminated by the 2012 EMD Update and carries no meaningful advantage in 2026.
AI content penalty — Google does not penalize content for being AI-generated. It evaluates content quality regardless of production method. Low-quality AI content fails for the same reasons low-quality human content fails: thin information, no expertise, and no original value.
Demotion Signals to Avoid
The leak cataloged several explicit demotion mechanisms. Understanding what triggers demotion is as important as understanding what drives ranking.
anchorMismatchDemotion — inbound links with anchor text that doesn’t match the destination page’s content trigger demotion. Google evaluates both sides of a link for topical relevance.
GibberishScore — detects artificially generated, scraped, or machine-translated content. High gibberish scores risk page removal from the index. Recovery takes 3-6 months or longer.
trendSpam — detects artificial click manipulation. Manufactured click patterns may produce temporary ranking improvements, but gains reverse once artificial clicks stop, and persistent manipulation risks permanent demotion.
Nav Demotion — penalizes sites with poor navigational experience. Important pages buried deep in submenus may not be indexed at all.
Panda — the leaked documentation confirms Panda uses embeddings for content quality assessment. It functions as a site-level quality modifier — a Panda demotion affects your entire domain, not just individual pages.
Frequently Asked Questions
What is the single most important Google ranking factor?
There isn’t one. Google uses a layered system where multiple signals interact. But if forced to prioritize, the evidence points to content that matches search intent and satisfies the user (confirmed through NavBoost click signals) as the foundational requirement. Without intent alignment and user satisfaction, no amount of technical optimization or link building produces sustainable rankings.
Does Google use AI-generated content as a negative ranking signal?
No. Google evaluates content quality regardless of how it was produced. AI-generated content that provides genuine value, demonstrates expertise, and satisfies user intent is treated the same as human-written content of equivalent quality. The risk with AI content is that it typically lacks original information gain — the one quality signal that AI currently can’t replicate at scale.
How important are backlinks in 2026?
Still very important. The leaked siteAuthority attribute is built partly from link signals. The antitrust trial confirmed links remain a core ranking input. What’s changed is the emphasis on quality over quantity: link source authority, topical relevance, anchor text naturalness, and referring domain diversity all matter more than raw link volume.
How long does it take for a new website to rank?
The leaked hostAge attribute confirms that new domains face a period of reduced ranking capability. Practitioners estimate this period typically lasts 6-18 months for competitive queries. The timeline depends on how quickly you build authority signals: quality content, authoritative backlinks, brand recognition, and positive user engagement patterns.
Are Core Web Vitals still ranking factors?
Yes, but their direct weight is relatively low — Google has described page experience signals as a “tiebreaker” between otherwise similar pages. Their indirect impact through user engagement is larger: slow, unstable pages produce poor NavBoost signals (high bounce rates, short dwell times) that compound into ranking decreases over time. Note that INP (Interaction to Next Paint) replaced FID (First Input Delay) as a Core Web Vital in March 2024.
What is GEO and do I need it?
Generative Engine Optimization is the practice of making your content citable by AI systems — Google AI Overviews, ChatGPT, Perplexity, and similar platforms. With AI Overviews now appearing on approximately 48% of queries and 60% of searches producing no click, GEO is increasingly important for maintaining visibility. It doesn’t replace SEO — it builds on the same fundamentals — but it adds optimization for how AI retrieves and cites information, which is a different mechanism from how traditional search ranks pages.
Tupa helps international e-commerce and B2B companies grow profitably through data-driven Google Ads and SEO – with the execution speed of a China-based team and the transparency you expect from a Western agency.
Tupa is a certified partner in Google Ads
Kiara Foster
Head of Content
Kiara
Edit this chat template from WP Admin > Templates > Floating Elements